Tuesday, May 30, 2017

Using SOLO to structure Final Evaluation Questions

My NCEA Design and Visual Communication are up to evaluating their final poster designs. I looked at the support I had included on the class site for this and decided it was not good enough. The students are nearly there with their project and I didn't want them to fall at the final hurdle for want of an evaluation that was lacking depth.
I decided to structure the questions in the evaluation around SOLO so that when they write it, they have a gradually increasing level of depth.
Link to document here

Architect Poster Evaluation


Describe
How many images have you used.
How you have laid everything out on your design.
The type of fonts you are using for the title and the main information.
List
The design elements that you have used in this layout design.

Explain
The effect that you have created with the way you have laid out your design.
Why you think this effect has been created.
Why you chose the images you are using.
Why you chose the fonts you are using and what effect they give to the overall design.
Analyse
How the design elements work together to create the effect you wanted to achieve.
How you have reflected your architect’s style in how you have designed your poster.
Reflect
On what you have achieved with this design by giving your opinion on what the most successful and least successful parts are and give reasons for your opinions.
Imagine
What you could do to improve it if you were to start again.
Evaluate
How you think people people will react to this poster design - you can ask people for some feedback if you wish to include their opinions.


Possible keywords

Colour, Proportion, Focus of attention, Symmetry, Whitespace, Layout, Shape, Font, Balance, Scale, Size, Flow, Hierarchy, Proportion,
Visual Impact, Contrast, Position, Alignment

Adobe Photoshop, Adobe Illustrator, Architect, Style, Elements


Sentence starters


I have used ____ number of images on my design.
I have laid out my design by __________ and by using _________
The design elements that I have used in my layout are __________
The type of fonts that i chose are ______ They look like ________


The effect that has been created on my design is ________
I think this because ____________
I chose the images that I have used because __________
I chose the fonts that I used on my design because________
They give this effect ____________
Design element _____ and ______ work together well because_____
They create the effect of _____________
I have reflected the style of my architect’s work by _________


I think that the most successful parts of my design are ______
I think this because _______
I think that the least successful parts of my design are ______
I think this because __________
If I were to start my design again, these are the things that I would improve ________
I think that they would be an improvement because ___________
This is what people think of my design when they saw it __________


Monday, May 29, 2017

Student feedback on making their own rewindable resources.

During one of my Manaiakalani ClassOnAir episodes, I had my class of Year 12 and Year 13 students create their own rewindable resources about sketching in isometric using the isometric grid sheets. Blog post here
We put these resources on a blog that was made especially for the purpose of students teaching skills and activities to others.

I wanted to know from the students what they thought of doing this kind of activity and if it was worth doing more of in the future.


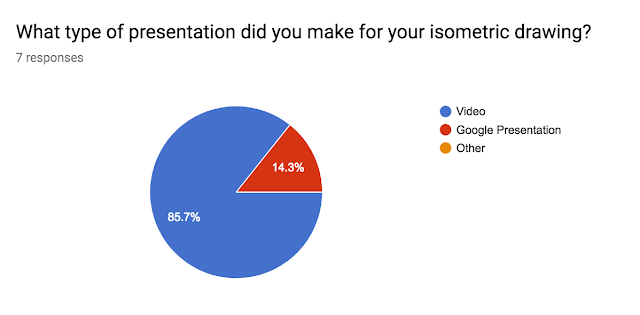
Question 1
It is interesting to see that most of the students chose the video rather than the Google Presentation. The video is more of an immediate response where as the presentation means taking the pictures then producing the resource with them.


Question 2
It wasn't too hard to make the resource as they all know how to make videos using the iPads or make a presentation in Google.
The student who rated this at 2 made a video, and after talking to him, he did not find it easy to talk to the camera as he was drawing. He felt that his english was not clear enough.


Question 3
It is good to see that my examples and the fact that I was there added to the ease of this activity.
It is interesting to note that talking to the camera was the reason why one student found this easy while it was the main reason that another student did not find this easy at all even though his confidence in the actual drawing activity is high.


Question 4
I had a chat with the boys after they filled this form in for me to dig a bit deeper into what they were thinking. My feedback on this comes later in the post.


Question 5


Question 6
Not many of them did the analysis for me at the time, so I think some of the answers here are a bit of a "fib".... !!!! .. or maybe just a response to not having done it.


Question 7
After chatting with the boys, the Year 13 students who have done DVC (graphics) with me for the past 2 years are the ones who got the least out of this activity in terms of their personal learning. I think this is fair enough as they are already confident in their use of isometric sketching as I have made them do it for 2 years!!


Question 8
A mixed answer which is good. Some will use these, and these students are the ones who are new to DVC and have not had much experience in drawing in 3D. The others have much more experience so it is understandable that they will not use these for them selves at the moment.


Question 9


After the boys had filled in this Google Form for me (and during for some of them), we had a really interesting chat about the feedback that they give to their teachers. One of them admitted that he tried to say what he thought the teacher wanted to hear. Another was unsure of what to put as he did not find the exercise useful, so I had to reassure him that it was honesty that I was after.
I tried to stress with them that when teachers (laying emphasis on me at this point as it was me asking them for feedback at the time) ask them for feedback, it is to improve how the course was going. If something is not to their liking they need to say so on the feedback or they cant help things change and get better.
I used the example of last year, when 2 Year 12 boys gave me feedback that they didn't like the fact that I made the whole group research Art Deco instead of giving them a choice. The upshot of that was them helping me to design the Level 2 course for this year.

This then led to a conversation particularly with the student who had given me the most negative feedback.
He is a really good artist. He does Art at Level 3 too as well as DVC and doesn't feel the need to do drawing exercises like this to remind him of what to do. He did not like talking on camera while making his video as he does not feel confident about his language ability. 
I asked him if he would feel better about it if he was making skills videos for the younger students, like the Year 9 and 10 classes. Again, he was not keen, with his reasons still being the talking on camera. When I gave him the suggestion of a silent video (or with music in the background) with written subtitles explaining what was happening, he was very keen. As I continue to use the blog we made for the students to use to remind themselves of skills, I will be asking him to make resources for the junior students to use. 

It is great that a bit of potentially "negative" feedback has brought about a great conversation and a possible direction to go in in the future.


Thursday, May 25, 2017

Using SOLO for Self Assessment

After starting to read "SOLO Taxonomy: a Guide for Schools Book 2", I have started to reassess the self assessment sheets that I had started to put together. Initially, I was including what level they were on, the description and a space for the students to include the evidence. After thinking about it, I realised that I didn't need to include the evidence column as all the evidence is on the sheet they are working on. In "SOLO Taxonomy: a Guide for Schools Book 2", it talks about making the target vocabulary explicit so the students know what kind of words they are needing to use at a particular level. This has resulted in me adjusting the way I have structuring these self assessment sheets.
I have produced two sets up to now. A describe chart and a compare and contrast chart, both with matching self assessment sheet to refer to.

They are both activities that are at a particular SOLO level, the describe is at multistructural and the compare is at relational, but the structure gives the opportunity for the student outcome to be assessed at all levels depending on how much depth they have included.

I have continued what I started in terms of using a coloured visual diagram on the self assessment chart to visually indicate what part of the whole thing the student has completed.

Next step is using this with the students to see how it goes. I have new Year 9 and Year 10 groups, so they look like likely candidates for experimenting and see how these go.

Describe chart


Monday, May 22, 2017

Manaiakalani Google Class OnAir Lesson 7 - Using their isometric skills on design developments

Click here to see the whole Class OnAir Team


This is lesson 3 of 3 in a set of lessons about isometric sketching.
In the first lesson the students learned the isometric sketching skills they need for their project work.
In the second lesson, the students consolidated what they had learned by creating their own rewindable resources about isometric sketching.
In this lesson, the students are using their isometric skills to produce the design development work for their product design projects.

Direct Instruction
The Year 12 students 9and any Year 13 students who want the reminder, as we went over this least week), are to come round the front for a drawing demonstration.
The students are shown how to use the isometric skills that they worked on last week on their design developments.

My Year 12 and Year 13 class entering the room and getting on with their individual instructions. (including 1 Year 11 student who has joined this class)


Here is the direct instruction for what the group has to do to produce their design developments based on their isometric skills sessions last week.


Detailed Lesson Plan


Lesson Topic :- Design Development using Isometric Drawing skills

Level 2 - Development of concept ideas - AS91342
Level 3 - Development of concept ideas - AS91630
Year Group :-  Year 12 and Year 13
Learning Outcome
To be able to produce design development drawings in 3D using isometric drawing skills. They have to combine their concept ideas, the feedback from their client and their 3D drawing skills to produce a range of design developments of their product design.
Success Criteria
Using SOLO

Uni
structural
Multi
structural
Relational
Extended abstract
Produce 3D drawings that replicate simple design concepts in 3D.
Combine the use of crating and guidelines to reproduce design concepts.
Analyse concept ideas and produce design developments that use isometric skills that explain the best elements of the concept sketches.
To be able to reflect on the concept sketches and create design developments based on the elements that have been evaluated as the best. These design developments are created with appropriate use of isometric sketching skills.

Links with the New Zealand Curriculum
Level 2
Curriculum Level: 7
Learning Area: Technology
Strand: Design and Visual Communication
Achievement Objective: Outcome development and evaluation
Critically analyse their own and others’ outcomes and evaluative practices to inform the development of ideas for feasible outcomes. Undertake a critical evaluation that is informed by ongoing experimentation and functional modelling, stakeholder feedback, and trialling in the physical and social environments. Use the information gained to select, justify, and develop an outcome. Evaluate this outcome’s fitness for purpose against the brief. Justify the evaluation, using feedback from stakeholders and demonstrating a critical understanding of the issue.
Achievement Standard: AS91342

Level 3
Curriculum Level: 8
Learning Area: Technology
Strand: Design and Visual Communication
Achievement Objective: Outcome development and evaluation
Critically analyse their own and others’ outcomes and fitness-for-purpose determinations in order to inform the development of ideas for feasible outcomes. Undertake a critical evaluation that is informed by ongoing experimentation and functional modelling, stakeholder feedback, trialling in the physical and social environments, and an understanding of the issue as it relates to the wider context. Use the information gained to select, justify, and develop an outcome. Evaluate this outcome’s fitness for purpose against the brief. Justify the evaluation, using feedback from stakeholders and demonstrating a critical understanding of the issue that takes account of all contextual dimensions.
Achievement Standard: AS91630
  • Thinking
  • Using language, symbols, and texts
  • Managing self
  • Participating and contributing
Prior knowledge

They have produced 2D concept sketches of lighting (level 2) and shelters (level 3).
They have feedback from their clients about their concept sketches.
They have done exercises based on isometric sketching using the grid sheets - including using crating, combining shapes and ellipses.

In their projects they have done product research and seen their client. They are into the design production and have created concept ideas based on what their client initially wanted and have shown their client these concepts to get some feedback.
They are now ready to develop these ideas into something more usable and practical.
Lesson Sequence

Session 1
Student Activity
Teacher Activity
  • Sit round the table with the teacher and watch the demonstration. Ask questions where needed for clarity or with elements to do with their own design concepts.
  • Demonstration of using isometric grid technique to draw design developments.
  • Stress use of crating to construct the design.
  • Sketch examples using both the construction from the side and the base methods, depending on the concept idea they are wanting to develop.
Session 2
Student Activity
Teacher Activity
  • Have their concept ideas open and make decisions about what direction to take their design developments based on the feedback from their client.
  • Draw design developments using key parts of their concepts. Focus on making changes and improvements from their concepts.
  • Draw in isometric using the support grid sheet.
  • Individual or small group help as needed for individual problems based on concept ideas.
  • Keeping students on track with using the grid paper as a guide to the isometric format.

Resources

Plain paper
Isometric grid sheets
Drawing pencils
Sketchbooks
Isometric exercises and rewindable resources made by the students.
Next Steps

We will be moving on to including colour and tones on these 3D drawings so they are rendered to look like they are made from specific materials.
We will also be including cross sectional views so the students can think about how the designs will be put together.
We will also be including notes that explain how the design will be used, what it will be made from and how it will be constructed. These notes will also include how the design satisfies the needs of the client.
Reflection and Analysis

What went well?

The students remembered their isometric skills quite well and were applying them to their own design ideas. They understood what they needed to do and got on with it. They had a pleasing amount of confidence while they were working, even when it wasn’t going quite as planned. It was good to see them just getting on with it even when mistakes and misunderstandings were happening throughout the process.
They are always more than happy to support and help each other when they are stuck and they are never shy to ask for help which is great.
They had completed the drawing of at least one or two different designs by the end of the session today so we are ready to move on to talking about rendering next lesson so they can create a more complete set of designs.

What did not go so well?
Some confusion as to the process, especially in terms of using centre lines and construction lines to help support where elements go within the crate.
Deciding what part of their concept ideas that they were going to move ahead with. This is related to their client not being specific about this but giving a more general feedback, so did not give them a very direct way to go.

What could I do better?
We could have looked at each other’ work as a team and the feedback that was given, and come up with ideas and directions to go in for each other.
Produced some handouts that had the bare bones of crates / guidelines / centre lines for some specific shapes so they had these to refer to.


Ongoing Lesson

Here is the ongoing lesson after the direct instruction by the teacher has been given. It shows Year 12 ad Year 13 students getting on with their work and the teacher giving help where needed as the lesson goes on.


Examples of design development work supplied to students.

Saturday, May 20, 2017

SparkShop AKL 20117

Today was a good day for professional development at Spark Shop Auckland 2017.


I presented about using Google Drawings to make SOLO Taxonomy resources, to encourage higher order thinking.


Here is team Manaiakalani who went on the day....


Thursday, May 18, 2017

Making rewindable resources with the students

My mixed class of NCEA Level 2 and Level 3 students have been practicing their isometric sketching skills in preparation for drawing their design developments for their product designs.
To reinforce their learning, they have been making rewindable resources for them to refer back to if they forget what to do. This was quite a simple skill but I want them to get used to the idea of making these resources for skills as they learn them, so they have a bank of them to refer to. I also want them to get used to sharing them so they are looking at and referring to each others work.
To get all of the resources available in one place we are putting them onto a blog made specially for this. This blog was started during Jump Start last year, but this was the first time we have had chance to use it this year.

What was good to see during this was the fact that the students were focusing on their isometric resources and not the skill itself, so they didn't realise how good their 3D drawing had got.

As part of this activity, we looked at each others work and analysed what they thought of it. This feedback was filled in on a Google Form.  I have also given the students access to the results of this analysis so they can see what others thought about their work. We had a chat about this, so they knew that it is about the work and not the person and not to take anything personally.

I have sent this Google Form to the students to find out what they thought of this activity and if it is useful enough to continue with.

Manaiakalani Google Class OnAir Lesson 6 - Making Rewindable Isometric Resources


Click here to see the whole Class OnAir Team

Direct Instruction
The students have been practicing their 3D drawings skills, with a focus on isometric using grid sheets.
They were shown the options that they could choose from to create a digital resource that could be referred to afterwards by them and other members of the class to remind themselves of what they had done.
They could then choose what skill they wanted to showcase and how they were going to do it.
The students were also shown the self assessment form that was shared on the class communities that they are going to fill in to give each other feedback on their work.

Student created work on Ako Ngātahi blog


Direct instruction for producing the rewindable digital resources


Direct instruction for peer to peer assessment and feedback


Detailed Lesson Plan


Lesson Topic :- Creation of rewindable resources based on isometric drawing skills.
Level 1 - Preparation for chair designs - AS91067
Level 2 - Development of concept ideas - AS91342
Level 3 - Development of concept ideas - AS91630
Year Group :- Year 11, Year 12 and Year 13
Learning Outcome
To consolidate their skills about isometric sketching by the creation of their own rewindable resources.
The outcome will be some form of rewindable resource from the selection of choices given or a method of their own choosing.
Success Criteria
Using SOLO

Uni
structural
Multi
structural
Relational
Extended abstract
To video or photograph themselves working with no reference to key points or explanation.
To video or photograph themselves working / producing an isometric drawing. Steps are shown in order to create the final piece of work.
To create a digital resource to use as a reminder about the key steps in producing an isometric sketch. The resource will show the steps in order that need to be taken so it can be followed as a reminder.
To create a digital resource to help themselves and others remember the key points of isometric sketching. The resource will be clear, show the steps in order and explain each step.
Links with the New Zealand Curriculum
Level 1
Curriculum Level: 6
Learning Area: Technology
Strand: Design and Visual Communication
Achievement Objective: Outcome development and evaluation
Critically analyse their own and others’ outcomes to inform the development of ideas for feasible outcomes. Undertake ongoing experimentation and functional modelling, taking account of stakeholder feedback and trialling in the physical and social environments. Use the information gained to select, justify, and develop a final outcome. Evaluate this outcome’s fitness for purpose against the brief and justify the evaluation, using feedback from stakeholders.
Achievement Standard: AS91067

Level 2
Curriculum Level: 7
Learning Area: Technology
Strand: Design and Visual Communication
Achievement Objective: Outcome development and evaluation
Critically analyse their own and others’ outcomes and evaluative practices to inform the development of ideas for feasible outcomes. Undertake a critical evaluation that is informed by ongoing experimentation and functional modelling, stakeholder feedback, and trialling in the physical and social environments. Use the information gained to select, justify, and develop an outcome. Evaluate this outcome’s fitness for purpose against the brief. Justify the evaluation, using feedback from stakeholders and demonstrating a critical understanding of the issue.
Achievement Standard: AS91342

Level 3
Curriculum Level: 8
Learning Area: Technology
Strand: Design and Visual Communication
Achievement Objective: Outcome development and evaluation
Critically analyse their own and others’ outcomes and fitness-for-purpose determinations in order to inform the development of ideas for feasible outcomes. Undertake a critical evaluation that is informed by ongoing experimentation and functional modelling, stakeholder feedback, trialling in the physical and social environments, and an understanding of the issue as it relates to the wider context. Use the information gained to select, justify, and develop an outcome. Evaluate this outcome’s fitness for purpose against the brief. Justify the evaluation, using feedback from stakeholders and demonstrating a critical understanding of the issue that takes account of all contextual dimensions.
Achievement Standard: AS91630
  • Thinking
  • Using language, symbols, and texts
  • Managing self
  • Participating and contributing
Prior knowledge

The students have been working through isometric skills exercises with the teacher, and have drawn basic shapes, used crating and drawn curves and ellipses.
Lesson Sequence

Session 1
Student Activity
Teacher Activity
  • Sit round with the teacher as they go through some options available to produce their rewindable resource. Make a decision about what equipment they need based on what kind of resource they are planning on creating.
  • Show students the options available
  • Using the drawing board projector and laptop to produce a screencast
  • Using the iPads to record the page as they draw.
  • Using the iPads to take photographs at each stage as they draw in order to produce a Google Presentation of steps.
Session 2
Student Activity
Teacher Activity
  • Creation of digital resources based on isometric sketching. They can use whatever equipment and resources they need for this and may need to move to different areas if they are recording and need quiet.
  • Help where needed for individual students or groups of students.
  • Supplying of additional resources and equipment if called for.
  • Uploading  / help with the uploading of the completed resources to the class communities.
Session 3
Student Activity
Teacher Activity
  • Use the self assessment tool to watch the work made by others and analyse it. This tool  (google form) will be available in the class communities for them to access and the results of this form will be published there too for them all to see the results.
  • Students will critically analyse the work of others based on the criteria in the google form.
  • Students will look at the results coming in from the form and see what others thought of their digital resource.
  • Explaining / discussing with the students about how to look at the work of others critically and how to be honest about it when they know the people involved.
  • Discussing how to read the results about their own work without taking it personally, but taking it as a chance to see where they can improve.

Resources


Isometric grid paper - to be printed off
Plain A3 paper
Drawing pencils

iPads
Drawing board projector and laptop

Next Steps

The students will now be moving on to using these skills on their own design work. The resources they have created will be shared in all 3 class communities so all of them are available for all the students to watch and refer to if they need to.
Reflection and Analysis

What went well?

The students came up with their own ways to produce the resources.
“Can we use our phones?”....yes
“Can I make a moving gif on my phone?”.... Yes
“Can i make a stop motion?”.... Yes
The students were comfortable working by themselves or in pairs, which was good to see and is a direct roll on from the group work I have been building into the Year 12 course. They did not even think about it anymore, they just did it.
They were so engrossed in making the resources they did not realise their 3D drawing skills in isometric were really good.
We had a double period to do this so there was plenty of time for them not to rush this activity and could get properly into it.
Reading the feedback that they have started to give each other was fun as it was what I was thinking but I kept it to myself. It is good to see that they pick things up in others work.

What did not go so well?

The weaker members of the group were working alone and had difficulty doing the explanations on the steps.
The weather was terrible so there was not too many places available for them to go and get some quiet for filming.

What could I do better?

Give more options for creating the resources.
Have sentence starters and scaffolding ready for students to use if they need it when they are writing the explanations on the steps.
G
G
Google From for the students to complete to give feedback to each other about their work.


Here is the link to the results of this form 

This is the ongoing lesson on the day