Showing posts with label students as teachers. Show all posts

Wednesday, May 15, 2019

Year 13 Client Presentation

My Year 13 class have been working on their concept ideas and it is time for them to show them to their client for feedback. They can then move onto design developments.
We had a preparation session the day before where I spoke with them then gave them time to do some planning on a piece of paper so they could be clearer with their thoughts.

The students took turns in presenting to their client, which I videoed, and then their client spoke to them individually about what she liked and wanted them to develop.


The day after the presentations, I gave the students this rubric to work with.
They were given a random student to give feedback to and they had to follow the guidelines on the rubric.
Emphasis was on supportive feedback and writing that made sense (sentences, not single word grunt
Their videos were put up onto the class Google Plus community and the feedback had to be given in the comment sections under the videos.

Link here to document

Check the community to see everyone's feedback. They did really well with the feedback even though they were nervous about doing that before hand about giving feedback to their peers.


Monday, May 29, 2017

Student feedback on making their own rewindable resources.

During one of my Manaiakalani ClassOnAir episodes, I had my class of Year 12 and Year 13 students create their own rewindable resources about sketching in isometric using the isometric grid sheets. Blog post here
We put these resources on a blog that was made especially for the purpose of students teaching skills and activities to others.

I wanted to know from the students what they thought of doing this kind of activity and if it was worth doing more of in the future.


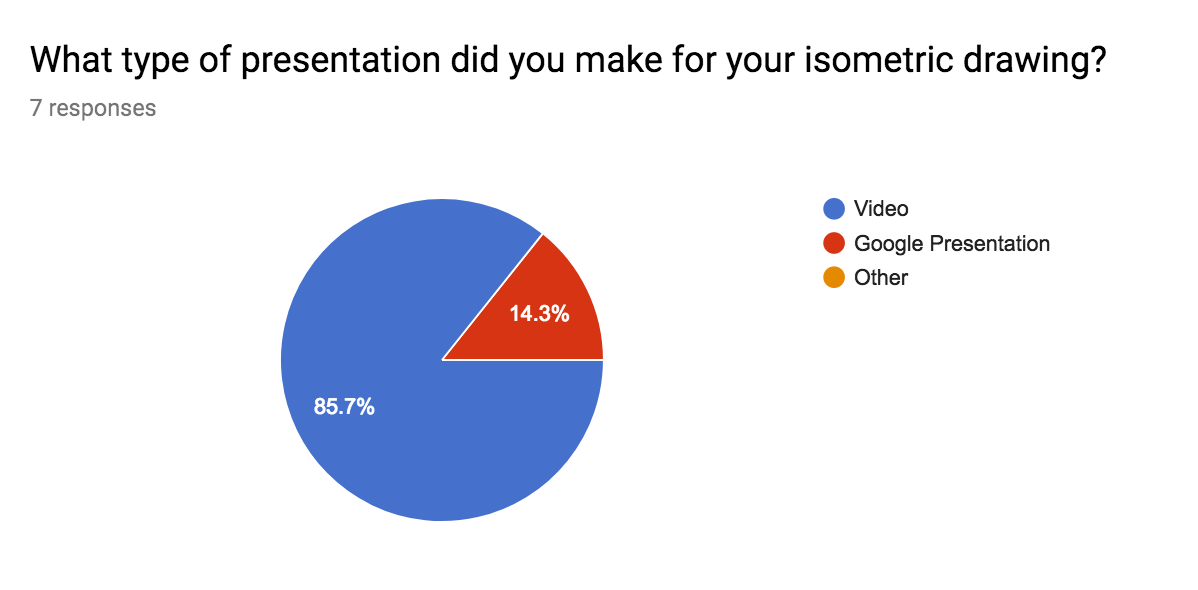
Question 1
It is interesting to see that most of the students chose the video rather than the Google Presentation. The video is more of an immediate response where as the presentation means taking the pictures then producing the resource with them.


Question 2
It wasn't too hard to make the resource as they all know how to make videos using the iPads or make a presentation in Google.
The student who rated this at 2 made a video, and after talking to him, he did not find it easy to talk to the camera as he was drawing. He felt that his english was not clear enough.


Question 3
It is good to see that my examples and the fact that I was there added to the ease of this activity.
It is interesting to note that talking to the camera was the reason why one student found this easy while it was the main reason that another student did not find this easy at all even though his confidence in the actual drawing activity is high.


Question 4
I had a chat with the boys after they filled this form in for me to dig a bit deeper into what they were thinking. My feedback on this comes later in the post.


Question 5


Question 6
Not many of them did the analysis for me at the time, so I think some of the answers here are a bit of a "fib".... !!!! .. or maybe just a response to not having done it.


Question 7
After chatting with the boys, the Year 13 students who have done DVC (graphics) with me for the past 2 years are the ones who got the least out of this activity in terms of their personal learning. I think this is fair enough as they are already confident in their use of isometric sketching as I have made them do it for 2 years!!


Question 8
A mixed answer which is good. Some will use these, and these students are the ones who are new to DVC and have not had much experience in drawing in 3D. The others have much more experience so it is understandable that they will not use these for them selves at the moment.


Question 9


After the boys had filled in this Google Form for me (and during for some of them), we had a really interesting chat about the feedback that they give to their teachers. One of them admitted that he tried to say what he thought the teacher wanted to hear. Another was unsure of what to put as he did not find the exercise useful, so I had to reassure him that it was honesty that I was after.
I tried to stress with them that when teachers (laying emphasis on me at this point as it was me asking them for feedback at the time) ask them for feedback, it is to improve how the course was going. If something is not to their liking they need to say so on the feedback or they cant help things change and get better.
I used the example of last year, when 2 Year 12 boys gave me feedback that they didn't like the fact that I made the whole group research Art Deco instead of giving them a choice. The upshot of that was them helping me to design the Level 2 course for this year.

This then led to a conversation particularly with the student who had given me the most negative feedback.
He is a really good artist. He does Art at Level 3 too as well as DVC and doesn't feel the need to do drawing exercises like this to remind him of what to do. He did not like talking on camera while making his video as he does not feel confident about his language ability. 
I asked him if he would feel better about it if he was making skills videos for the younger students, like the Year 9 and 10 classes. Again, he was not keen, with his reasons still being the talking on camera. When I gave him the suggestion of a silent video (or with music in the background) with written subtitles explaining what was happening, he was very keen. As I continue to use the blog we made for the students to use to remind themselves of skills, I will be asking him to make resources for the junior students to use. 

It is great that a bit of potentially "negative" feedback has brought about a great conversation and a possible direction to go in in the future.


Thursday, May 18, 2017

Manaiakalani Google Class OnAir Lesson 6 - Making Rewindable Isometric Resources


Click here to see the whole Class OnAir Team

Direct Instruction
The students have been practicing their 3D drawings skills, with a focus on isometric using grid sheets.
They were shown the options that they could choose from to create a digital resource that could be referred to afterwards by them and other members of the class to remind themselves of what they had done.
They could then choose what skill they wanted to showcase and how they were going to do it.
The students were also shown the self assessment form that was shared on the class communities that they are going to fill in to give each other feedback on their work.

Student created work on Ako Ngātahi blog


Direct instruction for producing the rewindable digital resources


Direct instruction for peer to peer assessment and feedback


Detailed Lesson Plan


Lesson Topic :- Creation of rewindable resources based on isometric drawing skills.
Level 1 - Preparation for chair designs - AS91067
Level 2 - Development of concept ideas - AS91342
Level 3 - Development of concept ideas - AS91630
Year Group :- Year 11, Year 12 and Year 13
Learning Outcome
To consolidate their skills about isometric sketching by the creation of their own rewindable resources.
The outcome will be some form of rewindable resource from the selection of choices given or a method of their own choosing.
Success Criteria
Using SOLO

Uni
structural
Multi
structural
Relational
Extended abstract
To video or photograph themselves working with no reference to key points or explanation.
To video or photograph themselves working / producing an isometric drawing. Steps are shown in order to create the final piece of work.
To create a digital resource to use as a reminder about the key steps in producing an isometric sketch. The resource will show the steps in order that need to be taken so it can be followed as a reminder.
To create a digital resource to help themselves and others remember the key points of isometric sketching. The resource will be clear, show the steps in order and explain each step.
Links with the New Zealand Curriculum
Level 1
Curriculum Level: 6
Learning Area: Technology
Strand: Design and Visual Communication
Achievement Objective: Outcome development and evaluation
Critically analyse their own and others’ outcomes to inform the development of ideas for feasible outcomes. Undertake ongoing experimentation and functional modelling, taking account of stakeholder feedback and trialling in the physical and social environments. Use the information gained to select, justify, and develop a final outcome. Evaluate this outcome’s fitness for purpose against the brief and justify the evaluation, using feedback from stakeholders.
Achievement Standard: AS91067

Level 2
Curriculum Level: 7
Learning Area: Technology
Strand: Design and Visual Communication
Achievement Objective: Outcome development and evaluation
Critically analyse their own and others’ outcomes and evaluative practices to inform the development of ideas for feasible outcomes. Undertake a critical evaluation that is informed by ongoing experimentation and functional modelling, stakeholder feedback, and trialling in the physical and social environments. Use the information gained to select, justify, and develop an outcome. Evaluate this outcome’s fitness for purpose against the brief. Justify the evaluation, using feedback from stakeholders and demonstrating a critical understanding of the issue.
Achievement Standard: AS91342

Level 3
Curriculum Level: 8
Learning Area: Technology
Strand: Design and Visual Communication
Achievement Objective: Outcome development and evaluation
Critically analyse their own and others’ outcomes and fitness-for-purpose determinations in order to inform the development of ideas for feasible outcomes. Undertake a critical evaluation that is informed by ongoing experimentation and functional modelling, stakeholder feedback, trialling in the physical and social environments, and an understanding of the issue as it relates to the wider context. Use the information gained to select, justify, and develop an outcome. Evaluate this outcome’s fitness for purpose against the brief. Justify the evaluation, using feedback from stakeholders and demonstrating a critical understanding of the issue that takes account of all contextual dimensions.
Achievement Standard: AS91630
  • Thinking
  • Using language, symbols, and texts
  • Managing self
  • Participating and contributing
Prior knowledge

The students have been working through isometric skills exercises with the teacher, and have drawn basic shapes, used crating and drawn curves and ellipses.
Lesson Sequence

Session 1
Student Activity
Teacher Activity
  • Sit round with the teacher as they go through some options available to produce their rewindable resource. Make a decision about what equipment they need based on what kind of resource they are planning on creating.
  • Show students the options available
  • Using the drawing board projector and laptop to produce a screencast
  • Using the iPads to record the page as they draw.
  • Using the iPads to take photographs at each stage as they draw in order to produce a Google Presentation of steps.
Session 2
Student Activity
Teacher Activity
  • Creation of digital resources based on isometric sketching. They can use whatever equipment and resources they need for this and may need to move to different areas if they are recording and need quiet.
  • Help where needed for individual students or groups of students.
  • Supplying of additional resources and equipment if called for.
  • Uploading  / help with the uploading of the completed resources to the class communities.
Session 3
Student Activity
Teacher Activity
  • Use the self assessment tool to watch the work made by others and analyse it. This tool  (google form) will be available in the class communities for them to access and the results of this form will be published there too for them all to see the results.
  • Students will critically analyse the work of others based on the criteria in the google form.
  • Students will look at the results coming in from the form and see what others thought of their digital resource.
  • Explaining / discussing with the students about how to look at the work of others critically and how to be honest about it when they know the people involved.
  • Discussing how to read the results about their own work without taking it personally, but taking it as a chance to see where they can improve.

Resources


Isometric grid paper - to be printed off
Plain A3 paper
Drawing pencils

iPads
Drawing board projector and laptop

Next Steps

The students will now be moving on to using these skills on their own design work. The resources they have created will be shared in all 3 class communities so all of them are available for all the students to watch and refer to if they need to.
Reflection and Analysis

What went well?

The students came up with their own ways to produce the resources.
“Can we use our phones?”....yes
“Can I make a moving gif on my phone?”.... Yes
“Can i make a stop motion?”.... Yes
The students were comfortable working by themselves or in pairs, which was good to see and is a direct roll on from the group work I have been building into the Year 12 course. They did not even think about it anymore, they just did it.
They were so engrossed in making the resources they did not realise their 3D drawing skills in isometric were really good.
We had a double period to do this so there was plenty of time for them not to rush this activity and could get properly into it.
Reading the feedback that they have started to give each other was fun as it was what I was thinking but I kept it to myself. It is good to see that they pick things up in others work.

What did not go so well?

The weaker members of the group were working alone and had difficulty doing the explanations on the steps.
The weather was terrible so there was not too many places available for them to go and get some quiet for filming.

What could I do better?

Give more options for creating the resources.
Have sentence starters and scaffolding ready for students to use if they need it when they are writing the explanations on the steps.
G
G
Google From for the students to complete to give feedback to each other about their work.


Here is the link to the results of this form 

This is the ongoing lesson on the day


Thursday, December 1, 2016

Student made Rewindable Learning

When our Year 10 students started their Jump Start courses, I made them a new site especially for these 4 weeks. It is full of all the skills we will need through next year to take us into merit and excellence.
Part of this site is the Ako Ngātahi page, where I am talking about the students making their own digital learning objects (DLOs), that they can use to embed their own skill knowledge and teach others how to do something.


In our double period today, we made a start on this. We have had 2 and a half weeks of skills so far so the students had to choose which one they wanted to break down.
I eventually want them to use the drawing projector that I made so they can record themselves drawing and rendering. Today, we made step by steps on Google Slides.
I then made a new blog specially for this work so the students can upload their skills work over the year. This blog is going to be for all year levels.
There were 2 examples uploaded today, with more "in progress".
Link to this blog here
My hope for this work is that in the process of teaching someone else how to do something, the student's skills are cemented.


Tuesday, May 13, 2014

Students as the Teachers

Over the past couple of years, I have noticed that my knowledge of using all the Googly stuff gets stuck into my head much more as I have to show others how to do it. I have also found that the action of making the how to screen casts, where I have to be really clear about the process, has been really beneficial to me in my own clarity and understanding.
This term, I decided to try this out on my Level 1 class and get them to make a "how to" instruction set about something they had just learned.
We have been learning how to render a few different surfaces, like wood and plastic.


They had a practice through the process of a couple of the techniques, then they had to decide which one they were going to use as their example of a teaching how to.
I made them a quick example to show them how I wanted them to set it out using a Google slide show. This was also a good time to show them the new crop feature in Google slides, which they were delighted with.
I didn't put any written instructions on my example, so we had a class discussion about what possibilities they could put on each slide to explain the process to someone who didn't know what to do. Their growing experience with these class discussions meant that they quickly came up with some good ideas as a class, without too much fuss.

I feel it was a useful exercise for the students. One of their internal assessments is how they render their designs within a project (AS91066 -  Use rendering techniques to communicate the form of design ideas), so they need lots of practice with the techniques. If they can get the steps firmly in their head by teaching someone else, then they can concentrate on improving their techniques through practice.

Saying of the lesson through all this has been :-
Practice makes better...

Here are their how to's....