Saturday, March 21, 2015

It's the Little Things ...

I have spent a ridiculous amount of time this term fussing over the navigation of my new site.

I want this to be right because :-

  • Students want short sharp tasks, not long huge pages to drag through.
  • Students need to find where they are easily within a project if they are working outside of the classroom.
  • The site needed to be cleaner and not so "full" looking as it was confusing to find things with my last site as I had too much on show.


My old site was easy. It was all along the top with drop downs to projects.


This then led to project pages, where the whole project was on one page with a table of contents at the top, and links out on the page to other areas on the site or external sites.


This year, on the new site, I needed something different.
I am trialling a new way of working this year, where the students work through the tasks in their own time while we work on skills and collaborative activities in the lesson time. Later in the year, some students will also be doing the course totally in their own time as they do not come to the lesson at all. So, I needed a navigation system that was easy to follow for the students so they know exactly where they are.
When I trialled this last, it was one module, so the navigation down the side bar to the separate tasks worked quite well.


Seeing as I am putting the whole of Design and Visual Communication on the new site this year, this method will just not provide enough clarity for all the pages that will be involved. The example here is not even complete with all the pages. I really don't want all the pages on permanent show and the side bar takes up valuable page width.


I have gone back to the horizontal bar with the main areas on show all the time.


When you click on each of the project pages, there is a navigation at the top of each page that is basically just a single row table.


I have made my site a set width of 1000px, so I just have to know how many task pages there will be within the project, and make a table with one row and that many columns.
As I wanted to make this navigation bar stretch across the whole width of the page, I went into the html and changed the width of each of the table columns. (1000 / no of task pages ). This makes the cell size nice and even and fills the whole width.

I then just had to write the names of the pages in the cells and link them up to the project pages. I only had to do this once, as copy and paste worked really well for all the formatting and links, so the same navigation could be put at the top of each of the project pages.

This method is working well as the names and links can be changed for each project, so all the project pages can be "hidden" unless you are doing that project. This keeps the top navigation nice and tidy.

A small glitch at the start was that I had called the links task numbers ... task 1, task 2, etc... This is all good until the daft teacher can't remember what work she put in which task number. If I can't remember, then how can I expect the students to keep up? They are now labelled with titles.

A lot of fuss over a small thing? Yes, it is, but if I have got this right, then students can concentrate on the work and not spend half their time trying to find where they are. 
I want them to do this out of the classroom without me being there to point where things are.

I think I've finally cracked it....

Friday, March 20, 2015

Big Thumbs Up for Online Moderation ....

This year was the first year that I have submitted work for moderation that is totally online.

This is the standard form for submitting moderation - link here - and this has normally had to be sent along with physical copies of everything - the student's drawings, printouts of research and printouts of everything they have completed. This had to be put together with a paper copy of the planning for each standard being moderated.  It was a LOT of paper to send away and printing off my planning, which was all on a Google site with links to all sorts of resources, was just messy.

So in February this year, the first all online moderation was sent for DVC.
On the moderation form, the planning on my site was linked to from the standard description and the student work was all on their own Google sites, so this could be linked to from their names listed on the form. The assessment sheets were linked to from the grades listed on the sheet.
A quick check to make sure all the links worked and it was all open to the public and the forms were shared with NZQA.

This was so much easier and went really smoothly.

I received the feedback today, which was also online. This is a change too as they used to send the sheets back to us in the post.

Here is the feedback from the two Level 1 standards that were moderated for DVC this year.


Needless to say, I am absolutely delighted with the feedback, especially this bit ....


Happy Dance !!!


Using Google Plus Communities in a Secondary School Classroom


Come and visit our Design and Visual Communication communities ...
Level 1
Level 2
Level 3 ( this one is on trial this year )

If you want to know how to do Google Plus stuff, check out the How To site here

Thursday, March 19, 2015

Can we Analyse our Design Work by Talking About it?

We had a great PD session after school today at Stonefields School. We were working together on iPad use in the classroom and I was part of a great group lead by +Michelle George. We were looking at using the Explain Everything app. Listening to Michele explain how she used the app in the classroom, giving us tips on the basics and how to share templates and activities with students using the Teacher Dashboard and the smart copy function. It was giving me some great ideas and one in particular that I want to try out quite soon on my Level 1 students.

I have set up a very simple template for analysis of design work. The students are designing posters at the moment to display the work of a famous architect, and they have to explain their design choices using design terms and elements.

I have put in a selection of questions for them to answer and a space for them to add a picture of the design they are analysing.


The plan is for them to find this template in their graphics folder, as I will have put it there via smart copy on the dashboard and they will download and open it in Explain Everything.
They can then put a copy of one of their design developments in place and record them selves talking about their design.

My big questions are :-

  • Will this help the students who are not so hot at the writing of their design analysis?
  • Can the students do a better analysis when they are talking about it instead of typing / writing?
  • Can the students explain better when they are talking about it? 
  • Can they give a more realistic opinion on a design when talking about it?
This work is internally assessed, so a verbal analysis will be fine, and the video file can be embedded on their Google sites as evidence.


Here is my example when I tried this out ....


Do Real Design Problems lead to Greater Engagement ?


"So what went right today?" was how I was left at the end of the afternoon when I had just finished having a double period with my year 10 group.
I am the first to admit that year 10 is my "nemesis" year group and I am constantly grateful for the help, support, shoulder that my fellow teachers give to me in times of need.

Today, we got underway with an activity which we had got partially through on Tuesday.
I brought up the fact that I needed a few volunteers to design some CD covers. Our HOD music had brought the possibility to me a while ago. His students are creating their own songs based on our school values of RISE - Respect, Integrity, Success and Responsibility, which they are putting onto CD's. These CD's have cases which need cover art.
Four volunteers came forward and we set to working out what they needed to find out. They wrote up a set of questions and off they went to interview their "client" - the HOD music.
When they came back with his answers, we sat and did a brainstorm of possibilities of images to use. This then was slowly converted into a mood board of images that were printed out and they got on with 2 design ideas each.
We have a very tight deadline as this is needed by the end of term ( another two weeks ), so they have next Tuesday's lesson to complete their designs then they have to go and present them to their client to see which way the final design has to go. On Thursday's double lesson next week they have to learn to use Adobe Illustrator, produce a final design each and make a mock up of the final product. These then need to be show to the client and a decision made as to which one goes into production.

The 4 boys are LOVING IT !!!!

This situation has the following factors :-


  • Real life situation
  • Very tight deadline
  • Work that will be seen and used by a real audience
  • They volunteered for the work after being given all the details


I don't know which of these points is affecting this situation the most or if it is a combination of them all but I want to bottle it. Absolute magic.

PS... I think some of the others in the class will be doing some design ideas too on Tuesday.. hhmmm

Monday, March 16, 2015

Nice is not a design term!!!

My Level 1 DVC group were working on their analysis notes today. They have to include analysis of the work with all of their design developments and this is the hard part for them. We get around that by putting all the design developments up on the Level 1 Google Plus community (Link here),  and everyone makes comments on each other's design work. The rules are : - one positive comment and one supportive improvement comment. There is also the rule that "nice" is not a design description!!!
We have already had practice by analysing existing poster designs, and we talked about layout, colour, font choice, use of white space, focus of attention etc....
What we did then was start to take these comments and use them in their own work.
All of the students have Google sites for their project work. This will develop into a design portfolio over time.
They have their design developments saved out of Adobe Illustrator as image files and embedded onto their sites. We were then putting a table under each one, with columns for "what is good about this design" and "what can I  improve in this design". The comments from the community were used and reworded for this table.


Our next step is to make a plan for the final design based on what was said by everyone here.

The standard for this work is AS91069 Promote an organised body of design work to an audience using visual communication techniques.

To aim for excellence at this, the description is :-

Effectively promote an organised body of design work to an audience using visual communication techniques involves: 

• selecting and presenting the features of an organised body of work to an audience.
• purposefully selecting and applying techniques to ensure layout, composition and visual impact are appropriate to the context of the brief and audience.
• communicating a high quality presentation that is convincing, shows accuracy of layout, visual impact, and precise execution of techniques.

They are analysing the visual communication, layout and composition of the other members of the class. They are actually doing more analysing of work doing it this way as they have to write comments on all three developments of the whole class, but as they find it easier to analyse the work of others than their own, they don't seem to notice that they are doing a lot more of it!!

This year, I think i will get them to put a link to the Level 1 Google Plus community on their own sites, so the examiner / moderator can see the work that they do there too, even though that is not the part that gets marked in the end, it was part of the process.

4 credits before the end of term, here we come!!

Sunday, March 1, 2015

Having a Little Trouble Letting Go...

When we had our first Manaiakalani Innovative Teacher meeting this year, we discussed that one of the valuable things that we got out of this process was everyone being honest and open with their sharing. Good or bad.... so here is some "not so good" from me.

I have discovered recently the main flaw in my plan of working with an online format for my students to follow out of the class room. That main flaw is basically ME.

I am having difficulty letting go of what I do in the classroom, working through the projects in a set order with the students in the class. When I did the practice run last year, it was with a small group of Year 10 students while my Level 1 and 2 students were working through in my usual way. I didn't realise last year that this was going to be an issue.
The positive to this is that I have woken up to myself early in the year and will give myself a good slap talking to, and get on with it. I have been teaching for 20 years in September this year. Surely I am not so "stuck in my ways" that I cant give this a good go? I have found myself using excuses like, not all the students have working net books at the moment. For goodness sake!!
A more realistic fear that I have is that I am experimenting with my students NCEA Level 1 and 2 courses, but if I can get over this, then I can monitor them closely and help where needed.
Ok.... time to get over my fear of loosing control and start trusting the students to work with me on this.

Tuesday, February 24, 2015

Using Google Plus to Save my Sanity ....

I have 30 students in my senior Design and Visual Commnication classes, which makes me happy that my Level 1, 2 and 3 courses can attract the numbers. These students come to me in 2 classes - one is a mixed Level 1 and 2 class and the other is a mixed Level 2 and 3 class. This sounds all good until you break it down further.

In my Level 1 and 2 class, I have a mix of level 1 students. Most are on the course from the start of the term. I have one student who trialed the online module for me last year, so he is starting the course this year further through than the rest.  I also have a student who has just started on the course, so he is behind everyone else. With the Level 2 students in the class too, that means there are 4 different things going on. I felt like I needed roller skates today!!
In my Level 2 and 3 class, I have a number of Level 3 student who are new to the subject and some who have come through Level 1 and 2. So that mix is in there with the Level 2 students too.
I am not daft, and with a limited number of students to fight over for senior courses, I am not demanding separate classes for each level and I am delighted with the 30 students who have chosen my subject. This is the reality, no problem, but I worry that my students are not getting the best of me at the moment. When we are more into using the new online course structure that I am setting up, this problem will be more. Until then, I seem to be turning into Mrs Grumpy at the start of the lesson.

I made a decision today that my Google Plus communities that I had set up to work collaboratively with the students will be their first stop as soon as they get in the class room.
I am going to put on there the instructions for each lesson, personalised / grouped, with links and examples included.
There is one ready for tomorrow for the level 3 students, which includes a link to the sample site so they know where they should be up to and a check list. How can two of them be so far behind so early in the course??  Seriously!!


If they get used to going here straight away, then they are getting more comfortable with the use of the community so going there to do group work will be more normal for them.
I will then not "go hulk" as one of my Level 1 students told me today :D
I always do examples of whatever I am asking them to do, so posting them here for them all to see together can only be a good thing as I am being open for opinion on my own work as well as expecting them to do it.

I've been re Certificated ...

I had to send "stuff" to Google to prove I have been using my certified status.
I just got the email through this morning... I am re certificated..
That sounds like it should hurt!!


Monday, February 23, 2015

Level 1 students check out an Online Design App ...

I shared the link to Lucidpress with my Level 1 students today. I wanted them to see what it was like, how easy it was and if it would be any good for their first project. We had tried one last year, Pixlr, but I wasn't quite happy with it for what we needed. It was great for image manipulation but no good for layout with text etc ( desktop publishing ).  When we wanted to put text it in, we could only put in a big long sentence, not a block of text, without a lot of fiddling about afterwards. Lucidpress was great for this and even gave you place holder text when you put in a text box. The students seemed to pick it up really quickly and were soon laying out images, text and titles. They even found out that they could share a document and work on it together, which was interesting to know.

When you are putting in an image, there are quite a number of options, but the one that interested me was "team images". If you are all logged in from the same organisation, you can share research images that everyone has uploaded. Very useful.


Here is one of the layouts that my students made today. They shared it with me so I could see it in the app.


When you share a design with some one, you can choose for them to just view it of have editing rights. On the menu, you can click to copy a shared document. This then becomes yours and shows in your list of documents, not in the shared list.


This will be very useful when I want the students to do layout exercises. We tried this last year on Google Drawings and it worked ok, but this app has a lot more to it. I can share the sheet that has the elements that I want them to work with as a view only and they can make a copy themselves. They can then complete the exercise using design terms like scale, proportion, hierarchy, font, etc ......
This is a good layout tool and can be used anywhere on any device as it is online used in the browser.
And... it's free!!

I like this getting the students to check out the apps that they are going to use. We can quickly get rid of any that aren't going to work!!
They liked this one. I think this one is a keeper.


Friday, February 13, 2015

Slowly slowly.....

My big plan of getting my whole Level 1 and Level 2 Design and Visual Communication courses up online as MOOC style / distance learning models is happening slowly.
The first module for Level 1 was easy enough as that was the standard I trialed last year so It was a simple case of copying and pasting from here to here with a few tweaks and adjustments here and there.

The fussy graphics teacher in me then came out as on the trial module I had the menu down the side of the site for easy access ...


This was ok for the trial one as the students only needed quick, easy access to the steps for the one
standard / project.
I now want to put all projects for Level 1 and Level 2 together on one site so I cant have this menu choice, as it would be too much to have down the side bar.

I have decided on a task bar across the top of the project pages that links to all the pages within that one project. This is a table with one row that goes across the top of each page. The task labels are linked to the appropriate pages. This table can change according to what project is being done as it is put in separately at the top of each page. The down side to this is that I have to manually put it in on each page, as it is not an automatic menu system like the side bar. The positives are that I can change and link them how I like and it does not take up page width.


I know this is a really nit picky thing to spend time fussing over but if I can nail down this layout from the beginning then I can concentrate on the important stuff...... like content.....
I have to keep reminding myself that I am designing a site that I want the students to access and follow while they are away from the class room. This means a really clear flow through the projects for them to understand, so if this then means me taking nearly a day fiddling about with different menu and navigation ideas, then that is a good use of time and thought.

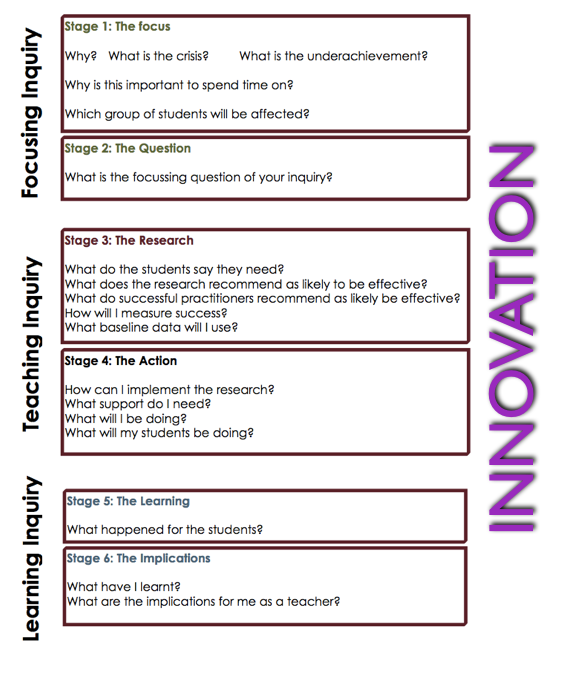
MIT15 Day 1 - Teaching as Inquiry

We are here at the lovely Spark building in town, an our first meeting day for MIT15.
The topic of our conversation at the moment is "Teaching as Inquiry" and how we are applying this to our research this year.

Here is "Focusing Inquiry" :-

Stage 1 - The Focus

Why?
What is the crisis?
What is the underachievement?
Why is this important to spend time on?
Which group of students will be affected?

My focus is to improve the NCEA achievement of my Design and Visual Communication students.
My students are weak in the analysis skills of the course and this lets them down with the achievement of the standards.
This is important is as it is a skill that is across subject areas and it is these skills that are needed for the students to achieve at merit and excellence. The analysis of design work is key to understanding their own work and knowing how to improve upon it.
The group of students will be all of my Level 1 and Level 2 DVC students. I will also include any Year 10 students who want the opportunity to start some Level 1 credits.


Stage 2 - The Question

I plan to see how the use of online courses, in a MOOC style can affect student outcomes in these areas:

  • Starting the DVC course early, in Year 10. This will get them an early start on Level 1 credits.
  • Doing the online components in their own time at Level 1 and 2 and using more of the class time for group analysis work and skills practice, as it is these elements that will gain the higher levels of achievement for the students.
  • Offering the courses to students who do not have space on their timetable due to other option choices.


Monday, January 19, 2015

My Thoughts on BYOD...

I have become increasingly worried over this holiday, as the back to school adverts start. There are lots of "your stop for BYOD" type things going on.
What is worrying me is that these devices are seen as the "thing" for school now, with no thought as to what is being bought and how it will be used in school. Do parents know when they are buying their BYOD device for the new school year, just how many other devices the teachers are having to cope with within their classroom?


I am coming at this from the standpoint of my own situation. We are a cluster of schools who are mostly working 1 to 1 with devices. Manaiakalani schools are lucky as we have lots of support from the Manaiakalani Education Trust which enables our parents to fund a device for our students over three years. We all have the same device in our classrooms and as I am one of the teachers who are helping other teachers with the PD for this, I am very grateful for this fact. I can focus my time on Google and online how to's and not have to worry about trying to help with lots of different devices in a classroom. I am a bit of a geek and am pretty confident in fiddling about with a bit of tech till I work it out, but I would not be confident in a classroom full of students with, potentially, a different device each. I want to be able to focus on the teaching tasks and learning using the online environment as a tool, not worrying about whether what I want to do will work on all the different devices the students are using.
Having to try and help staff with problems with all sorts of different devices sounds like a nightmare to me, and one that is loaded with so many negative possibilities that BYOD is setting itself up for bad press when the devices get used as paper substitutes by nervous staff. I know how much staff PD has gone into working the way that we are at the moment and wonder about the feasibility of an unending variation of devices that might turn up. How can we keep up?
Teachers need to be able to move into the 21st century style teaching environment with confidence in what they are trying to do, pedagogy wise. We need to focus on making sure we are using structures like the SAMR ladder in order to make sure we are making the most of the tools we are using. In my experience, this is more than enough to expect.  I feel that this can not be happening when you don't know what to expect in terms of equipment.

If you are reading this and completely disagree with me then please leave a comment as I would love to have feedback from the other side of this.

Thursday, January 15, 2015

Class Size and Online Courses....

Here is an interesting read about class sizes of online courses...
Link Here

Personally, when I tried an online course myself, which inspired me to go that direction for my students, the part I found intimidating was the forum. There were hundreds of people doing the same course and the forum was no longer a helpful place, but rather a sounding box for what you "knew" about  the topic.

Thursday, December 4, 2014

Crowd Source Research

I have made a start on the planning of my Level 1 and 2 courses for next year, where they are set up MOOC style, with all the steps there for the students to work on in their own time.
Link here ( note.... not complete !!! )

Part of this thinking has been to see what other difference I can make to how I had my DVC site laid out for the students before.
I had everything all together in one place, the instructions, the resources, the examples, everything.
This proved to be a little confusing with the content being too much to search through.
Link to the old site here

My plan for this year is using a blog for the research, content, information etc and keeping the "mooc" site for the step by step instructions to keep it clean for the students to understand.
Link to the blog here


The first part of this blog idea is that the students can search here first fro information about their project.
There will be information, videos, extra links to find out more etc.. This will be the launch pad for the rest of their research on a certain topic.

The other part of this blog idea is the tab along the top labelled "Team Talk". This is a page on the blog with a comment section a the bottom where they can write.
I want this to be the area where the students can add interesting bits of research that they find while doing their projects. 
These can then be added to the main blog for everyone else to access and use.
It will eventually become a "crowd sourced" research area.

I decided to do this idea as a blog rather than use the Google Plus community for this too, as it is easier to set up the labels and search functions on a blog, as their will eventually be a lot of labels and this may become unmanageable in a community.

I have embedded and linked this blog on the class site so the students have easy access to it.

Friday, November 28, 2014

Having a First Play with Thing Link

We were having a go with Thing Link today to make our MIT14 page look more interesting...
Here is mine... it is my first play with Thing Link


MIT 14 Final Presentation

Today we had our final session for MIT 14 at the wonderful Spark building.
We all completed our final presentations, summing up our projects for the year.

Here is mine....


Wednesday, October 29, 2014

Posting Date is Looming..

So...it is what I have lovingly nick named "hell week".
Everything has to be finished off by the Level 1, 2 and 3 groups and parceled up ready to be picked up next Tuesday morning.
Unlike last year, when I had to print off everything that the students had put on their Google sites in order to send it away, (link to blog post here) this year I am able to send away the original drawings plus links to the student sites. So all their notes and research can stay on the site and not have to be printed this year.
So, the Google URL shortener will be used to the max!!

The plan is to put one printed sheet into each bag with the students original drawings.
That sheet will have links to the students Google sites with all their project work on.

This week has been a flurry of site checking and making sure everything is included and open to the world. ( as well as the usual panic to finish everything, but what's new?? )
Easy eh?
Fingers crossed......

Wednesday, October 22, 2014

I am a coding fan!

Last Friday, I was lucky enough to be invited along as one of the staff on a Year 10 trip to MIT for lesson one of a three lesson coding course.
They were very patient with us as we learned the basics and spent time putting it into practice. The students were a mix of complete novices like me and some with experience from lessons at school.

I was hooked immediately. I loved that what you were doing could be viewed straight away in a browser, so you could see your progress. This appealed to the Graphics teacher / visual learner in me.
We got up to style sheets by the end of the afternoon, but the last 20 minutes of that went right over my head as I was suffering from brain melt.
They promised to go over that gain at the start of the next lesson. I hope so.

So I spent all weekend practicing what we did on Friday and then decided to buy a copy of "Beginning HTML5 and CSS for Dummies". With this together and the w3schools.com website, I started to experiment with different things.

It is a combination of really exciting to have so much control and really frustrating.  You can make it look exactly as you want, but it wont work for the TINIEST little error. All weekend I looked for why my image embedding was not working. Then when I got someone else to look at it on Monday, we realised I had copied the code down off the board wrong on Friday. I had put "scr" instead of "src". ggrrrrr......

Anyway....
I have looked at tables, images, videos and mapped images over the last three days and am feeling good about where I am up to in less than a week.
My next step was to find some free hosting. I didn't want to pay up for something so looked for some free options. I opted for 000webhost.com as they offered a good amount of space for free.

So far I have been designing a site that could be used next year by my Level 2 students, so I am doing a site with information about design eras, starting with Art Deco.
I have 4 pages and a navigation bar to move between them.

Here is the link to the site - there are some blank areas but not too bad. I have been using photoshop to make the graphic elements like the header and the navigation bar.


I find that I am working on it in little slots of time all day. I don't seem to be able to stop fiddling with it!! I think I might be addicted!!

Here are the students last Friday after a busy afternoon coding. They look happy!!


I am hoping that if I get any students in DVC that are also on the DIGI trades course, then they will be able to make their own website as their design portfolio instead of using Google sites.
It opens up all sorts of possibilities.

Thursday, October 16, 2014

How To Site - One Year On

It has been a year since I started the Tamaki College How To site. This was to offer support for online needs.
I have been amazed at how much it has been used over the last year, and not just at school.


Sunday, October 12, 2014

uLearn 2014

I was at uLearn 2014 for the Thursday and Friday this year. I spent Wednesday in Wellington having a great time with some of my students at The Weta Cave and WOW.

My notes that I made on a Google doc during the breakouts I attended at uLearn are here.

On Thursday morning I sat in on Yoram Harpaz's breakout - Teaching Thinking - A guide for the Perplexed. He asked a lot of very interesting questions that really got my mind working.
He states : "there is no such thing as a general good thinker" , with strengths lying one way or another. We need to teach students how to be good thinkers and how to deal with the vast wealth of knowledge that is at their finger tips. It should not be a teachers job to teach the knowledge any more, but to help students analyse and use what is out there.


He states that these "Mindwares" are the elements that make good thinking

  • The skills approach - strategies, frames of thinking. Thinking tools and efficient use of them, thinking frames. This is what we have.
  • The dispositions approach - most important element - intellectual traits. motivated patterns of thinking, cognitive traits. Questioning, an original idea stimulates resistance, not just going along with everyone else. This is who we are.
  • The understanding approach - relations , performances.


Friday morning was spent with Tevor Bond talking about making question askers not question answerers.

The art and science of asking questions is not taught at school. Do we create an environment that discourages asking questions?
Who asks the most questions in the class? teachers or students?

At home, before they start school, children ask 50% of the questions.This is not a trend that is continued at school. Why not?
By the time they are in preschool, 5% of the questions are coming from students.

How long does it take for negative signals to come as a response to a child's’ questions? 
How many negative responses before switch off time for the student and they give up asking questions as it is seen as a bad thing?

In primary school, it is a 1 in 8 ratio of student / teacher asking the questions.

In high school, 99.98% of the questions come from teachers, with .02% from students.


My takeaways :-

How can I use the "concept design" stage of a graphics project to put the students into positions of "cognitive discomfort" ? They need to learn to accept that not all design ideas work and that is a good thing not a bad thing. They need to learn to fail with their design work and to be able to learn from that and move on, not throw those sheets in the bin and only keep the "good" ones.

How can I use the design process that we use in Technology to encourage the students to be the question askers?

How can I use blended learning approaches to give all students access to asking questions, not just the ones picked from a "hands up" session?
Some obvious solutions pop into my mind straight away in the form of Google Drawings and Padlet, where the students can put their questions and also be involved in the answering process. I will try this on each topic / project and see if the students are comfortable using these and get some feedback from them.


As usual, uLearn was a great chance to meet members of my PLN in person, and not just as really small pictures on screen!!

Monday, September 15, 2014

Ako Tamaki - Feedback

I have sent staff at Tamaki College a Google Form on Friday asking what they think of the Ako Tamaki Site.
This was the the request :-

Hello
As part of my Manaiakalani research this year into blended learning, I had the idea of making a website where the students make resources to teach other students. ( kind of like a Tamaki Khan Academy).
I had a group of students out yesterday to start putting together some ideas so we could present it to you as an idea.

Here is the site that we made :-


There is still work to add to this from what we did yesterday and there are still videos to make for English and Science.

Could you please take a look and see what you think?
I need to add feedback and thoughts to my research....

Here is a Google Form to fill in with your feedback.
Thanks very much


Here is the reply spreadsheet that came from that from :-
Link here


  • There is a general interest in the idea of a site like this for the students at Tamaki College. Some staff are happy to make resources for this site themselves with their students, others are not so comfortable doing that.
  • There is concern that the content on the site is as accurate as we can make it with no mistakes.
  • There is a general thought that the action of making the resources will help those students making them and that students will listen to each other more than the teacher at times.


Verbal feedback has included :-

  • The quality of some of the resources is low.
  • The interest os some of the resources is not as high as others.
  • More interesting tone used in the verbal information is needed on some of them.

Overall, the experiment was a success with lots of interest in continuing this idea. I appreciate the more "negative" aspects of the feedback even though this first try was more of a "concept sketch" than a finished product. It needs lots of development work and the feedback gives some direction for this to go in.

Thursday, September 11, 2014

Ako Tamaki

When the students get their netbooks re-imaged, part of that image is a shortcut to the Khan Academy. This is a great online learning space where students can learn about all sorts of topics.
It got me thinking. Can our students create their own "academy" where the leaners become the teachers of the following year?
In a bid to start exploring this idea, I took one of my Manaiaikalani days today and had a varied selection of students out of class creating videos centred on teaching something to someone who knows nothing about the topic.
I have had discussions with the HODs of all the subject areas so they could choose a couple of students for each area. They had to make sure that they came with the subject knowledge that they needed to get across as I would be no help there.

I made a couple of examples myself, to show them 1 or 2 ways they could use if they wanted to, but these were in no way the only ways I wanted them to work today.

The first method I showed them was the sticky note method. I was quite happy with this method as I had experimented on my Maths class a couple of weeks ago.


The second method was similar but using drawn, coloured and cut out elements.


After showing the group the two methods, showing them the site that I had set up to present it all on and arming them with an iPad for the day, we were off.

Some students were happy to use the methods I had shown them and stayed in the room and worked on that. Others wanted more live action shots and either took themselves away for filming or shouted at everyone to be quiet when they needed to. Some went and sat on the stairs to get some quiet for making screen casts.

Here are some photos from the day....


It took them a while to get going this morning, planning on paper first about what ideas they could do and what script they would need to say.
Once they got started on the filming, there was no stopping them. They were frustrated at first by the "no editing" rule, but soon got used to the idea of it all being done in one take. We kept them nice and short, so any do overs were not taking for ever to do.

I am still in the process of uploading the student's videos that they made today onto the site.

My plan is to present this to the whole staff and get some feedback from them as to what they think and if they think it is an idea that could move foreword.
I am seeing this as a long term view in regards to seeing the benefits. The videos that are being made now will only be used next year when the students new to the topic are needing this information. The bonus for the students making the videos now though, is that this process cements the knowledge into their heads.

We had a great time today making these videos and as a little bit of silly as we left the room, we positioned the funky shaped furniture into a particular pattern.


Saturday, August 30, 2014

The Power of the Sticky Note...

Last Friday, I sat in on the annual Manaikalani Hui. One of the items that we watched during the day was the Digital Immersion programme for teachers who are in the first year of working in a 1 to 1 classroom environment. They had been making videos about their teaching as enquiry journeys, using sticky notes as a method to cover the content in a step by step way. Thanks to +Fiona Grant for pointing me in the direction of her blog post about this.

I decided to have a go, as I happened to have a box full of LOADS of sticky notes,  and I decided to use my lovely Year 10 maths class as experimental subjects.
I didn't make one in advance and decided on having my first go in front of the whole class, so they could see the process and stuffing it up half way through was not the end of the world.
We had just been solving equations in algebra, so the topic for the movie was to explain how to do this.

Here is my video. Not too bad for holding my phone with one hand and driving the sticky notes with the other hand.


I got the students to work in pairs so they could rely on each other for maths knowledge and for understanding what they were doing.

Listening to the conversations while they worked was fascinating. They were talking about the Maths and working out how to break it down between them.
Arguing over who was going to do the voice over was common and one team got round that by typing in their explanation into their chrome book and getting it to speak!!

What was interesting to watch was the process. A couple of tries was needed, showing me in between times to see how they were doing. One team got confused with their voice over twice, so I decided on the second attempt that the feedback would not come from me but from the rest of the class. I played it to them all with the instructions for "constructive feedback ". They were good at that and could see where the explanation needed changing to make it make sense.

Here is the link to their blog, so you can see their completed movies, and some photographs of the process. I love the fact that some teams have found their own way of doing it and not just blindly copied mine and I also love how much Maths literacy was having to happen to accomplish this.

Thursday, August 28, 2014

Google Trainer

It was a good day today when I read the email from Google to say I have been accepted on the Google Trainer Program. Very exciting.
The link with the information is here, under the "Become a Trainer" heading.
There were quite a few different elements to get together for the application and I want to thank +Amber and +Dorothy for checking it through and making sure I had covered everything and my spelling was ok!!! Also, thanks to everyone who filled in the feedback form that I had to send as part of the evidence of receiving and responding to feedback from trainings I have given.
It was worth it.
Yay!


Friday, August 22, 2014

Presenting at the Manaiakalani Annual Hui

Today, all the MIT 14 group got together at Tamaki College where we were presenting to everyone at the annual Manaiakalani Hui about what we have been researching into this year.
My presentation got an overhaul for the occasion.

Here it is .....


Here is the link if you want to see the speaker notes.

Wednesday, August 6, 2014

Changing the Focus

My Level 1 Design and Visual Communication class have recently started their last project. They get to design a mobile phone. The standard that this is geared towards is AS91068 - Undertake development of design ideas through graphics practice.
As the focus of this standard is the development part of the design project, I have decided that the research and brief development can be done as a group, using Google Plus Communities and GAFE products. How they would normally approach this would be the standard way of everyone doing their own research and brief development with no input from each other. I want to see what will happen of I change the focus this year so the students get the experience f working on a project together and producing their own individual elements to be assessed.

We talked as a whole class about how many different types of mobile phone there are and then I split the class in to groups. One group was in charge of finding images of different types of mobile phones and uploading these images onto the class Google Plus Community for everyone to share. The whole class then had to go onto the community and make comments on / analyse these designs based on :-

  • How easy do you think the design is to use?
  • What kind of things can you do with this type of phone?
  • What do you think the weakest part of the design is?
  • Do you think the phone is aimed at a range of ages / people or do you think it is aimed at specific type of person?
  • What kind of materials do you think are used in the design?
  • What makes the design stand out from the rest on the shelf in the phone shop?


The other group was in charge of producing the Google Form questionnaire to send to their client. We had already done a whole class activity where we all fed into one Google doc with ideas for questions to ask their client. A wide variety of useful and not so useful ideas came out.
As you can see from the revision history, we had a good whole class input into this.


The questionnaire team had to decide which questions were important and present them in the form of a Google Form to send to the client. They are lucky enough to be working with Pip who works at Telecom to be their client. This is a new experience for them to work with someone else and someone else's design needs and expectations. I don't normally introduce design students to this way of working with someone else until they are at Level 2 or 3, so we are going to be using the Google Plus community to communicate and share with our client a lot as they are used to using this.


Here is the questionnaire that was sent to their client. We decided to send one from the whole class instead of lots from individuals asking similar / the same questions.


The class have all been making 3D plasticine models based on the description "comfortable shape". They had to focus on that and not worry about the fact that we are designing phones just yet. Photographs were taken as they made each one. Link to the album here. We sat all together and looked at the photographs on the board / projector and decided as a group which were the most important points that came out from all of the shapes that they made. This small list will then be included in the specification list :-
  • simple, curves, rectangular proportion, size in the hand, grip
It has been a new way to work for this project this year. I have done it this way so that their individual focus and time is going to be spent on where the credits are aimed, which is the development of the designs and they can work together on the elements that are not going to be assessed.

Tuesday, August 5, 2014

Why we Love to Cheat in Maths

I have recently been given the gift of a Year 10 Maths class. Their teacher left to work in another school, so after having relief teachers for a while, they came to me full time.
It has been definitely a different challenge for me to work online with a subject that is not my own.
I decided straight away to make my own Maths Google Site rather than use the one that the class teacher had already made. That would be like using someone else's planning and not doing it myself. If I was going to be invested in this class and how they were doing, then I needed to do it myself.
Link to their class site is here.

The work we are doing at the moment is algebra and we are onto multiplying and dividing powers.
The first thing that we did for this was to design Super Heroes.
Here are some links to some great online apps to do this :-


Hero Machine Link 1
Hero Machine Link 2

We posted these Super Heroes on the class blog as they were making them.

Here is an example of one of the Heroes that they made.


The next task was to use these Super Heroes in a battle, so they need to be given their powers.
The students helped me to put together this battle zone on a Google Drawing.


They were not not happy when we first made it as there was only 6 Super Heroes to choose from. So they made ( and found ) more!!

To play the game, you use the random number generator on the site to choose 2 opponents on each team. They then have to work out who would win.
The Super Heroes are multiplied together so the powers have to be added.
Later, they had to throw the "dice" again - 1 for multiplying, 2 for dividing, to add to the algebra use.

The random number generator on the class site was supposed to stop the cheating, so of course they found new ways to cheat.
As they had to make a copy of the battle ground in order to use it, they had control of the power numbers. Team powers were changed so that they would definitely win the battle.
This is great cheating, as knowledge of the algebra skill we were covering has to be in use for the cheating to work. I love it!!

The example here shows how the student put his on one side with a wildly exaggerated power with all the others on the other side... his working out is faultless....