Saturday, November 28, 2015

Visible Learning

I have had all of my planning online in the form of Google sites for a few years now. The students access the sites to get instructions, links, resources etc about the projects we are working on.
Link to class site here.
As a department, we have been working on making the Technology Achievement Objectives more accessible and understandable for the Y7-Y10 students.  We have worked on Level 1 to level 5 so we can show a clear pathway from our intermediates who come in for their Technology lessons through to our Year 9 and 10 students at the college.
This has been a really useful exercise for me as it made it really clear where the gaps are in my planning and make sure all the curriculum requirements are covered over a project.

As a school, we are moving towards "Visible Learning", where it is made really clear for the students why they are doing activities and what they are linked to.

Here is the sheet for the Year 10 product design project
Link here for the doc...

Achievement Objectives for Year 10 Mobile Phone Project - DVC
Level 5


Achievement Objectives
Learning Activity
Evidence
Resources
SOLO
Brief Development
Justify the nature of an intended outcome in relation to the need or opportunity. Describe specifications that reflect key stakeholder feedback and that will inform the development of an outcome and its evaluation.
  1. use a writing frame to justify a conceptual statement that includes what, who, where, when, why, and how
  2. identify the need or opportunity based on stakeholder feedback, and,
  3. identify the resources, based on stakeholder feedback and/or other considerations,
  4. identify relevant specifications based on attributes, that allows evaluation of the outcome eg. lists, table, notes etc
  5. in relation to the need or opportunity and resources available, describe one or more of the key attributes using following options
    • circle/colour/highlight the attributes which are key
    • annotation on the drawing,
    • written description
    • mindmap (extended)
    • verbal description (students record this onto netbooks)
Design brief written up on a Google Doc.

Work in groups to decide what would be good questions to ask the client / customer. Put ideas onto a shared Google Drawing. This is then posted in the community for all to see and use ideas from.

Google form used to collect questionnaire information from client base. Students put form onto the class community to receive input.
It can also be emailed out to targeted clients if needed.
This form can be individual or in pairs.

Analyse the results of the questionnaire ( use the graphing function of the spreadsheet ? )
Pick out the key points / most popular attributes that need to be included in the design work.
List these key points / specifications with the design brief.


Questions / writing frame structured around SOLO progression, building depth from unistructural to relational.

Group work can be based around 3 levels of SOLO.


Multistructural when listing attributes etc.
(Combine, describe, enumerate, list
Perform serial skills)
Planning for Practice
Analyse their own and others’ planning practices to inform the selection and use of planning tools. Use these to support and justify planning decisions (including those relating to the management of resources) that will see the development of an outcome through to completion.
  • use exemplars to show different options of planning tools for students to select and use
  • use planning tools such as Google templates, Gantt chart apps, Flowchart apps, Google apps etc, to manage planning and to record key decisions at different stages
  • specify timeframes that the tasks need to be completed (eg. due date, actual completion date), including stakeholder feedback (Google+, Google form, embed Google form into Google+ community)
  • tick box or log for ongoing reflection of tasks completed (blog, Google+, checklists etc)
  • use reflection to plan next steps, including results from stakeholder feedback
Make and post examples of project breakdown / timelines / planning sheets.
Students to make their own.

Use a spreadsheet for tracking of class work as they do it, and make it available for all students to see it all the time.

Google calendar embedded on class site for reference to timescale for tasks.

Student project planning - to include tasks / materials / equipment / timescale / changes / next steps


Multistructural when listing jobs to be completed / tools needed etc..
(Combine, describe, enumerate, list
Perform serial skills)
Outcome Development and Evaluation
Analyse their own and others’ outcomes to inform the development of ideas for feasible outcomes. Undertake ongoing functional modelling and evaluation that takes account of key stakeholder feedback and trialling in the physical and social environments. Use the information gained to select and develop the outcome that best addresses the specifications. Evaluate the final outcome’s fitness for purpose against the brief.
  • use research to generate brainstorms, sketches, drawings, models, images, diagrams, videos to describe possible outcomes
  • acquire feedback on functional modelling (eg. Google+) that enables further development of design ideas to meet the specifications
  • rank (pros and cons, checklists, slided scales) and view tests (eg. Youtube) of  possible materials/components from a given range (by the teacher) eg. Google+, and make appropriate selections
  • produce and test the prototype that meets the brief
  • evaluate the fitness for purpose of the outcome against the specifications (successful? or, not successful?)
Create a timeline of mobile phones through time to be able to see the changes that have happened - they can use google drawing / presentation / doc or any other means.

Group discussion question in the community about how changes have occurred in phone design. They can all see each others answers on the community post.

Analysis of a mobile phone of choice, using the SOLO question structure. This can be done on doc, presentation or drawing.

Produce sketches / concepts and models based on results of questionnaire and research. These are then scanned and photographed.

All design work, models and development work posted on the Google Plus class community for feedback from other members of the class. (scans, photos and screenshots)

Use TinkerCad to develop a 3D model to print - take screenshots of development work as they go.

3D print a final phone design drawn on TinkerCad

Photographs of final design to be posted in the community for feedback from the whole class based on a given feedback structure. These photographs can be posted with the original specification points so comparisons can be made by the class.

Write an evaluation of the final phone design / model based on the feedback received from the rest of the class.


Compare and contrast / timeline work is Relational.
(Analyse, apply, argue, compare/contrast, criticise, explain causes, relate, justify)


Presentation template structured to take the students through from unistructural to extended abstract in terms of their types of analysis questions.
Using research work for own ideas is Extended Abstract.
(Create, formulate, generate, hypothesise, reflect, theorise)

This is structured to take students from sketches to models and back to sketches with analysis notes based on SOLO structure.


Relational - when comparing shapes against each other and making judgements for design decisions.
(Analyse, apply, argue, compare/contrast, criticise, explain causes, relate, justify)

Technological Modelling
Understand how evidence, reasoning, and decision making in functional modelling contribute to the development of design concepts and how prototyping can be used to justify ongoing refinement of technological outcomes.
  • state/outline examples of functional and practical reasons for why various design decisions could or should be made; including maintenance requirements
  • explain how evidence gained from functional modelling was used to justify design decisions
  • explain how the evidence from prototyping was used to justify and evaluate fitness for purpose of the outcome
Class discuss / draw and make comfortable shapes - what makes a comfortable shape, why does it have to be a comfortable shape?

The work from the comfortable shapes exercise is then used to start creating concept ideas.

Ideas developed on TinkerCad to think about them in virtual 3D modelling - screen shots taken and analysis done.
Work to be posted in the class community for all to comment on and make suggestions for improvements. Reasons must be given for the suggestions.

Final design to be printed on the 3D printer for a final prototype.


Relational - when comparing shapes against each other and making judgements for design decisions.
(Analyse, apply, argue, compare/contrast, criticise, explain causes, relate, justify)


Relational when giving feedback and critiquing the work of others
(Analyse, apply, argue, compare/contrast, criticise, explain causes, relate, justify)


When I tried to apply this to my NCEA standards for my seniors, I did not find it as easy.
The achievement objectives go up to Level 8 of the curriculum, but it is not explicit anywhere how these link to the actual standards that we work on.

Our Year 10 groups have been collapsed and these students have started NCEA Level 1 earl this year. This is a new thing for us and our DP asked us to make sure the students understood the LANGUAGE of NCEA. This gave me an idea of how to approach visible learning with them.

I have altered the sheet so we worked together on the meanings of the first standard :-
Achieved, Merit, Excellence
This was done really easily on Google Drawings.

Here is the sheet that we are going to use..
Link to where it is on the class site
What I need to add yet, is the SOLO taxonomy structure that is built into the planning of the project so it is obvious to the students where it fits in.

Architect Poster
AS91069
Promote an organised body of design work to an audience using visual communication techniques
4 credits - Internal


Standard
What does it mean?
What will you do?
Resources
Achieved
Promote an organised body of design work to an audience using visual communication techniques.

selecting and presenting the features of an organised body of work to an audience.
Promote - present the work in some way

Organised - different parts working together as a whole

Body of work - more than one piece of design work by your chosen designer

Visual communication techniques - effective presentation of ideas using a range of methods - sketching, use of colour and tone, analysis … both drawn by hand and on the computer
  • Research pictures and information about your chosen architect.
  • Highlight which key pieces of information you will use in your poster design.
  • Use thumbnail sketching techniques to start to design the layout of your poster.
  • Develop your design work using a computer application - making sure you are using a few examples of the designers work, not just one.
  • Analyse the effect you have created with your layout developments.
  • Produce a final poster using Adobe Illustrator.
  • Write a final evaluation analysing your final poster.


Merit
Clearly promote an organised body of design work to an audience using visual communication techniques.

purposefully selecting and applying techniques to ensure layout, composition and visual impact are appropriate to the context of the brief and audience.
Clearly - easily seen and understood

Purposefully - with thought, not by accident

Select - choose from a number of options of techniques

Layout - how things are arranged

Composition - how the design is made from separate parts and how they work together.

Visual Impact - how the design looks and the effect it has
Achieved plus :-
  • Explain why you have chosen the images you have on your designs.
  • Produce a write up that summarises the life and style of the architect’s work.
  • Analyse your thumbnail sketches as to how you have arranged your layout.
  • Use design language in analysis of work.
  • Explain how design elements have been used to achieve the design developments.
  • Final design is very clear to understand, to read, to see. It gives a clear explanation of the architect’s work to someone else.


This level also depends on the quality of your work and on you showing your understanding of your Architect.
Excellence
Effectively promote an organised body of design work to an audience using visual communication techniques.

communicating a high quality presentation that is convincing, shows accuracy of layout, visual impact, and precise execution of techniques.
effectively - does the intended job very well

convincing - the evidence is there that your architect’s work has been taken into account in the layout of your poster.

accuracy - correctly laid out, with no errors.

execution - the method you chose to produce your poster
Achieved and Merit plus :-
  • Analyse the key points of the architect’s work and use these to explain their style.
  • Use the style of the architect’s work to influence the design of the poster.
  • Use design elements well in the layout of the design work.


This level also depends on the quality of your work and on you showing your understanding of your Architect.

Wednesday, October 21, 2015

Tinkercad Toolkit ...

I held one of the cluster toolkits for teachers this afternoon.
Our focus was using TinkerCad for 3D printing.

Here is the presentation I prepared with the resources in it.


We were learning basic skills and drawing a name tag on Tinkercad, and as I knew we would not have time to print these in the session, I made everyone a take away present.
I printed them in 3 different colours so they could choose :D

Sunday, October 11, 2015

Twitter Basics ....

Here are some basics for when you first start using Twitter ...


Signing up for Twitter


Making a Post on Twitter


Posting a Picture on Twitter


Posting a YouTube Video to Twitter


Searching for People to Follow on Twitter


Following People on Twitter via a Link


Following a Hashtag on Twitter


Posting to a Hashtag on Twitter


Friday, October 9, 2015

Got my uLearn15 Badges!!!


uLearn15 Presentation Day

It is day 3 of uLearn15 and it is time for my fellow Manaiakalani Innovative Teachers and I to present our years' research work.

Thanks to +Fiona Grant for the picture


Here is my presentation about Online Learning and Achieving Outside of the Classroom...
Here is the link to the presentation if you want to see the speaker notes...
Here is the link to the rest of my research this year...


Here is the link to the whole presentation where you can see the work of my fellow MIT15 colleagues. 
Find out more about the Manaiakalani Innovative Teacher programme here.


Thursday, October 8, 2015

uLearn15 Day 2

It's day two of uLearn15 and I had two interesting breakouts lined up for my day.

First up this morning was :-
Making 3D printing a reality in the classroom
This was run by Tim from Mindkits.co.nz

We got to see lots of different ideas and project possibilities.
If you have a 3D printer in your school, then get onto this website http://enablingthefuture.org/


This afternoon's session was :-
Space to learn | Designing effective learning environments
by Mark Osborne


My big take away from this session was that if you don't get your planning, practices and pedagogy right, then you can have all the fancy furniture that you like. If you don't get it all together, you will just end up going back to victorian teaching methods in 21st century class rooms and furniture.

Also, this rule of 3 was interesting, but only really if you are building new or doing some serious renovating ... hammer anyone??
Rule of three 
never more than 3 walls 
3 types of seating 
3 points of focus 
3 acoustic zones

3D printed bot says ... "it was a good day"

Wednesday, October 7, 2015

uLearn15 Day 1

After an early start on the bus, I got to town in Auckland for the start of uLearn15.
It started off today with a Keynote from Mr Grant Lichtman, where I saw his point with some things and disagreed with others. It would be boring if you agreed with everything some one said!

My first breakout today was :-
Digital Assessment and Moderation with Mr Alan Sorensen – Team Leader Digital Moderation, NZQA.
This was a breakdown of where NZQa are heading in the next couple of years with their plans for online moderation of internal standards and how they will support teachers more with this.

Next, I was having fun in the "Maker Space Playground" room.

 Perler beads are great fun and they take a lot of patience to get a decent looking design put together.
I had a little go at an initial ....


Next, I had a play with a 3D doodler from 3D Systems. Link here.
On the table where I was, 1 boy was just finishing off a pair of hand drawn doodled play sun glasses and another boy was busy making the parts for a model bicycle. Lots of free form possibilities....

Where I spent the most time in this breakout was on the mBot table.
Here is my little bot that I put together ...

The gentlemen from MakeBloc were then demonstrating how to move the mBots with the computer with commands and showing that they can follow a line.
I wonder if the boss will let me have one of these next year??? ( :D )

After a lovely lunch and some fresh air outside, this afternoons breakout was,
Drawing Thinking with Chrissie Butler - her resources are here.
I found what she said about drawing your own images to illustrate what you are trying to say rather than just finding them on the net, really rung true with me. I sometimes spend more time looking for appropriate images than I do preparing the rest of the content. This way, you can make them a lot more appropriate to what you are saying.

After doing a "warm up" series of quick sketches on paper, we mainly used iPad apps :-
The big thing was to keep it simple and not be held up with quality of drawing skills.

First of all, she talked about "Content Creation", and the exercise we had to do was draw images from a list of words that she gave us. As quick as we could.


Next, was to think about Visualising Thinking in a series of steps that could be animated if you wished.
Taking screen shots, or saving individual stages out as images resulted in something that was simple but could illustrate what you were trying to say in a series of steps. These steps can then be scrolled through on a presentation or made into an animation that runs itself or even into an animated gif with any online app.
The next step was a more personal reason to draw your thinking. This one was about using sketches for reflection for yourself.
She gave us the task of quickly sketching what worried us most at the moment, so with it being this time of year, mine is about getting the NCEA work completed in time for posting...

I used Paper 53 to draw my sketches and I found it a really good medium to use. Even when the drawings are messy and lacking detail, the app gives them a certain "style" which is quite appealing.
I will definitely be drawing more of my own illustrations from now on.

A full day... more tomorrow....

Thursday, September 24, 2015

Google Plus Collections - Good Place for Research???


I have been having a play with Google Plus Collections.
I have been making a test collection called "Interesting Design" just to see what it was all about and if it would be of any use to me and my design students.
After playing for a while now, I like it as a place to collect related items, but I decided to make a decision on wether or not to use it next year based on what my Y11 students think.

 I posted a poll in our class community to get a feel for what they thought after looking at my example collection. Today, we also had a chat about it.
They liked that it is so multi media - you can post links to sites, videos, images etc all about a related theme and they liked that others can see your research and you can see theirs.

What would improve Collections would be if we could have a collaborative collection where the class could input into the same place.
Maybe this will come in the future.

So... roll on next year and we can give it a go in reality during a project. Too late for seniors this year.. only 4 weeks to go!!

Monday, September 7, 2015

Making comments on Google Plus Communities ...

As a school, we have moved towards using Google Plus Communities as a method for students to share their work and to give feedback to each other. This doubles the impact of the work for the students as they are having to think about the work again to give quality feedback. In an effort to support them to give quality feedback, I was asked to come up with a graphic that could highlight the main points.
( This also gave me an excuse to give my new iPad app, AstroPad, a good try out with Photoshop. )


Thursday, September 3, 2015

SOLO structured questioning with Year 10 students

I have been thinking about questioning techniques with my students for a while now as a way to effectively analyse the design work of others and their own.
I had thought about question types with the different SOLO levels on this blog post here.
I then started putting together some example questions for my new Year 10 group to use to analyse the design of mobile phones. A great, helpful resource here was the iPad app made by Hook Education - Question Generator. This helped me to categorise my thoughts about this activity into where they should be within the SOLO structure.

Here is the presentation I made for the students to use to break down their questions.

We had a go at this activity this afternoon, and I was pleased with the improved level of thought that the Year 10's put into their analysis. It was quite a small start today, but it is definitely something that I want to build on. We need to get more comfortable with the idea so the students can then use the structure to build better questions of their own for a more in depth analysis.
Here are links to some student samples of the day ...
Me'e
Raihan
Misimoa
Mary
Lonise

Wednesday, September 2, 2015

First Live Periscope Posts of my Class....

I have been hearing a lot on line about the Periscope app and decided to give it a go myself. I installed it last weekend and had a go at live streaming during my walks round town on Saturday. I quickly became fascinated by all the live streams coming in from all around the world. Powerful stuff!!

Today, I met my new Year 9 class on their Technology rotation.
We needed to talk about safety in the workshop and my plan was to let them loose in groups, making their own safety videos on the iPads. While they were busy doing this, I made the decision to have a go at live streaming from the class room. I didn't warn the students before hand and they just thought I was videoing them normally on my phone. They were shy and "oh miss, what are you doing, unfair!!" to start with and then they really didn't care when they got into their task. All the time I was filming, I was secretly praying that no stray swear words would come floating though the work shop. So, fingers crossed and I gave it a go...
Here are links to the videos today...
Stream 1 , Stream 2,  Stream 3,  Stream 4,
It is good how it gives you the option to save it onto your phone, but it still keeps it online for you to link to as well. It puts up a notification in Twitter if you want it to to advertise your stream.
The next step will be to get the students to live broadcast themselves.... good stuff.

Getting Students to Test Design Apps

I have had my eye on an iPad app for a while. It is called Astropad. Link Here.
This app mirrors what you see on the computer screen so you can draw into programmes like Photoshop and Illustrator that you have installed on your computer in a much more natural way.
Students find it tricky to use the wacom graphics tablets as they have to look at the screen while drawing on the tablet. This takes a lot of getting used to as you are not looking at your "pen" tip as you draw, and this does not feel natural at all.
Another negative of the graphics tablets is that we have a couple of missing pens, which renders the tablets useless.
The Astropad app means they can look at the iPad while they draw and their work displays on the computer screen at the same time.
I put this on my iPad the other day and had a little go with it. I let a couple of my Year 12 DVC students have a go on it today to get their feedback and thoughts. They really enjoyed using it and found it very easy to draw with both in Adobe Photoshop and Adobe Illustrator on my laptop.
I think this will definitely be on my budget request for next year to install on the 5 iPads we have in DVC.
I really enjoyed getting their feedback today, as it is all very well me liking an app but it is them that is going to be using it the most!! ( and "K" discovered it works on games too .....sigh.... )


Saturday, August 22, 2015

Presenting at the Manaiakalani Hui

The annual Manakalani Hui was held at the Panmure Boat Club this year and my fellow MIT teachers and I presented our research to date.

Here is my presentation about online courses and achieving credits outside of the classroom.


Here is the link to my presentation if you want to see the speaker notes.

Wednesday, July 29, 2015

Celebrating the Small Stuff


Sometimes it is nice to celebrate the small stuff that happens in the class.
I have a student in my class who is not the most engaged student you will ever meet!! He has been working steadily in DVC this year, and keeping a pretty steady tally of credits going.
We have been using our Google Plus Community all year to share our work together so we can help each other out with comments and suggest improvements etc.
This week, the work has been modelling shapes that will be comfortable to hold in the hand, as we are designing mobile phones in this project. The students had to put the photos of these models on a Google drawing and analyse what it was about the shape that made it comfortable so they can use these design points in their phone designs.
My student in question did one of these yesterday then couldn't remember which other shape he had made in the photo collection. At the end of the day today, I was checking my emails and there was an update from the Google Plus community. My student had been working on his second analysis this afternoon and posted it up to the community. I don't see his class on a Wednesday so this was the first time he has done this independently and self managed like this. I did a little quiet "whoop" to myself. And yes, he was doing my work in some one else's lesson :D

I know in the big scheme of things, this is a really small thing!!.. but it was a big step for one student today.....

Tuesday, July 21, 2015

To Nag or Not to Nag... That is the Question...

The thing with an online course is this.....
You create it, send out the link to students to get them to sign up then you get to wait...
Will they sign up?
Will they do the work?
Will they be able to follow all the work you have put together?
Will they get stuck part way through?
Is there enough support built in?


I decided today to contact all the students who had originally signed up for the course, whether they have started something or not.
I did this by email so they didn't feel pressured of me being in their face about it.

"Hello Lovely  People who signed up for the online course...
This is just a little email to ask if you need any help or support with anything.
Don't be shy if you are stuck or have any questions

:D
Miss Ferguson"

How much contact is Ok?
When does it turn into nagging?

This online course idea is going to be good for students, with more opportunities, but i'm not sure it is good for my worrying!!

Monday, July 13, 2015

Organising Work in the Holidays...

It is the two weeks holiday at the moment and I received an email from one of my Year 10 students who have signed up to do the online course this year. This email was inviting me to view a folder of work on Google Drive.
He has started collecting his information about his chosen architect, and it is interesting to see how a student's mind works away from the "influence" of a teacher.
He has copied the instructions from the Google Site for this particular task onto his doc and made them into a checklist for himself that he is working through and ticking off as he goes. This doc was originally made and shared by me as place to put the information found about the architect so the students can read through it and assess what parts they need to use. It has a place to put links to their sources and the main area to paste their found information. I like the way this student has up cycled this doc to make more use out of it.
Maybe I need to add more "lists" into the planning of a task for students to use?


Saturday, July 4, 2015

Using Google Plus Communities with Year 10's

I have been using Google Plus Communities with my Year 10 class for the first time on this Technology rotation.
We have used them so that :-

  • Everyone can see everyone else's work so we can all benefit from the support and direction of the whole group
  • The work can be organised into categories down the left hand side and easily found
  • I can share examples with the students as they need them, so they are immediate to their needs and not having to be found on a static site.
  • I can record skills sessions and share them so the students have access to rewindable learning whenever they want / need it

I decided for this group, to change the whole Year 10 course and give them access to a Level 1 DVC project. I hope that this gives them a better understanding of what they would be expected to do if they choose DVC as one of their Level 1 options. As this is a Level 1 standard project, I felt that the added support that a Google Plus Community can give to a class would be a good step.
Here is a link to the community - it is set so that it can be viewed by anyone.
If you want some Google Plus help, check out the How To's here...

Here is a screen cast showing how we use it.


Monday, June 1, 2015

Making a Drawing Projector

I have seen drawing projectors in a couple of other schools and I really rather wanted one but didn't like the price of them.
I liked the way the whole class could see what was being explained / demo'd / shown by the teacher as it was projected onto the board via the class projector. I also thought I could use one to record drawing skills to add to the online "mooc" style that I have been using to set up my class website.


I decided to recycle one of the class drawing boards and with the help of part of a wooden handle and a small piece of scrap wood, I managed to spend less than $20. This was spent on a webcam to transfer the video across to a computer.

This worked really well using Quicktime. I chose "Mew Movie Recording", then this works for both uses. It shows on the computer screen what the webcam is seeing, so this can be projected onto the board via the class projector. There is also a record button so you can record what you do with the students or prepare one earlier to put on the class website.


Here are some very quick experiments I made today to test it out.

Test 1 - normal quality with no extra lighting.

Test 2 - normal quality with extra lighting from a clip on lamp.


Test 3 - high quality with extra light.


Test 4 - high quality with no extra light and drawn in pen


The file size is noticeably larger on the high quality recording. This was evident when saving the file and most evident when uploading the file to the web.
Is the difference in quality worth a 3 hour upload time? This as only a test so it was very short. The real ones will be a lot longer.

This "creation" has definite possibilities and I am looking foreword to giving it a go in class next week.
I will also be testing if it works with Screencastify, as this is on all the student's chrome browsers. If it does, then they can make some too on their chromebooks. !!

Wednesday, May 20, 2015

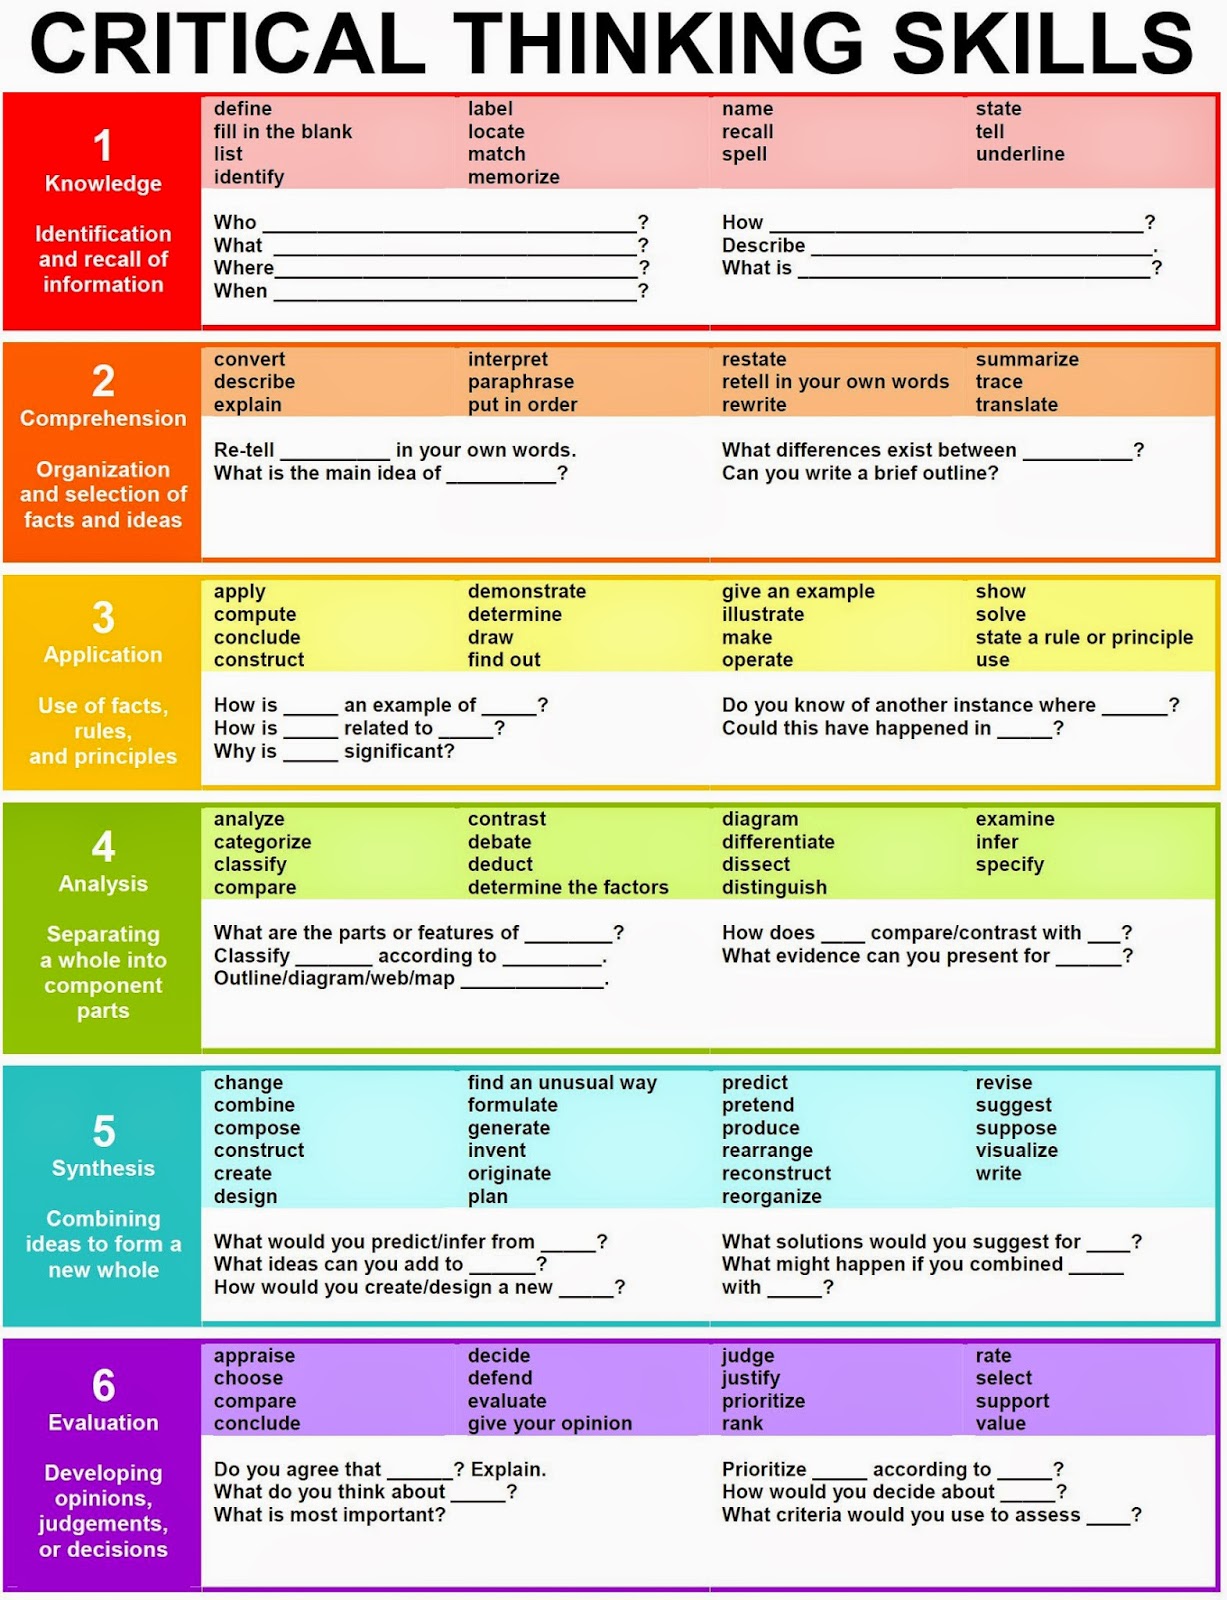
6 Areas of Critical Thinking.

This is a great graphic from  Enokson that shows key words, concepts and questions related to 6 areas of critical thinking. This can give my DVC students some starting points. sentence starters etc for when we are analysing existing design work and their own design work. The words really relate well to SOLO taxonomy too which we use to structure our project planning.


Tuesday, May 19, 2015

Tracking the Online Course...

It has been 4 days since I let the MOOC side of my Level 1 course go live. I emailed it to the whole of Year 10 on Friday and left it to see what happened.
So far, 4 days in, I have got 12 Year 10 students who have signed up for the online project which will give them 4 early Level 1 credits. More have expressed interest to me but haven't clicked the button yet.
When the students enrol, they do it by filling a a very quick Google form embedded on the site.  This then feeds the names into a spreadsheet. I decided to use this spreadsheet as the tracking sheet for the course, as it will keep everything nicely in one place.


When they enrol, I make an assessment sheet for them with the standard information on. This is linked on the "A/S" column. When they make their Google site and send me the URL, that is linked next ( there is one there up to now ). They choose which architect to research, and their choice is in the next column so I can remember what I am looking at when I look at their work. The G+ column is changed to orange when I make sure they have access to Google Plus on the admin dashboard, then green when they have joined the Level 1 community and introduced themselves. The images column, next, is when thy have started to collect pictures of their architects' work and have embedded it onto their Google site.
What I am liking here is the "add note" on the cells in a spreadsheet as I can write myself up to date notes as to what I have seen and any communication between me and the student.
Keeping on top of this is gong to be so much more important as I don't have the luxury of having these students in front of me in the class at all.

Sunday, May 17, 2015

Great Weekend Email Conversations

I sent out the link to my Level 1 online mooc module to all of the Year 10 students on Friday. I chose this standard to offer in this way at Level 1 as it is the easiest to do without having access to the Graphics room or specialist equipment.

Some of them have been signing up already and I have been having some great email conversations with them over the weekend as they get their heads around what they are doing. They have to do this totally in their own time with no class time.


They fill in a Google form to sign up, and then I send out their own copy of the achievement standard / assessment sheet so they can embed it on their site that they have to make as part of the process.

I have been able to see it through their eyes this weekend and make some key changes to some parts to make it clearer.
There is nothing like student voice to keep you on your toes!!

Student "L"

miss wat is this??
for??

did you sign up to do the level 1 dvc project?

No, i didn't!??

don't worry if you don't want to but your name came up on the enrolment sheet. Did you fill the form in?

No, i didn't fill it in sorry. but is it hard?? 

have a read through all the tasks and see what you think... no pressure..

I think it sounds fun, who will our audience be?? and do we choose an architect or do you give it to us?

if you look at the task bar to where it says architects, there is a choice there. If you dont like any of those, you can give me a suggestion :D

Ok, where's the task bar??

Inline image 1

jokes never mind miss i found it,, =)

thanks miss, can i email you again if i need help.....

any time you like :D


Student "S"

Hi Miss. I'm kinda stuck and confused. I have made my Level 1 DCV site which I've done with the help of your first video. But there's two other video's at the bottom of that one, do I ignore those two videos and move onto the 'Making your Site Public' ?

Yup. That's right. I put those there for the level 2 students so I could have all my vids in one place. Don't be shy if you are stuck. Just let me know. You are doing well. 

I have creating my site and the pages. It says to share the URL link to my teacher, do I share it to my tutor teacher? 

No. Me!!! Lol. I shall change the instructions on that one to make it clearer. Thanks. :)


great job!!

Hi miss me again. I have clicked on the 9 app squares and there isn't a G+ icon, I tried finding but no luck. So do I make a new google plus myself? or.. 

Type Google plus into a Google search. Still do it with your school log,in though.
....thanks for letting me know all these things as it means I can make my instructions clearer on the site :D


Student "I"

Y10 Assignment thing
it will take to long to make a new google + account 4 skwel so can I just my not school account!

Yeah ok.