Tuesday, May 16, 2017

Manaiakalani Google Class OnAir Lesson 5 - Isometric Sketching


Direct Instruction
Students will be learning how to sketch in 3D using isometric grid paper.
They have sketched ideas in 2D so far and need to develop their ideas in 3D. These isometric exercises will teach them basic techniques that they can apply to their own design ideas.
The teacher will use the drawing board projector to demonstrate techniques to the class while they sit round the front table to listen.
The students will then practice these techniques with one to one / small group teacher assistance where required.

The instructions were given in stages, not all at once.
The same / similar instruction s were given to two different senior classes on the same day. One was a mixed Year 12 and Year 13 class and the other was a mixed Year 1, Year 12 and Year 13 class.


Year 12 and 13 Group


Isometric Circles


Year 11,12 and 13 Group


Detailed Lesson Plan


Lesson Topic :- 3D sketching skills
Level 1 - Preparation for chair designs - AS91067
Level 2 - Development of concept ideas - AS91342
Level 3 - Development of concept ideas - AS91630
Year Group :- Year 11, Year 12 and Year 13
Learning Outcome
To understand how isometric drawing is constructed mainly of vertical and 30” lines.
To be able to visualise shapes in 3D.
To be able to construct shapes in 3D using an isometric grid.
To be able to use crating to construct more complex shapes.

The students will learn and practice isometric sketching skills so they can produce their design developments in 3D (isometric). The Year 11 students will be using these skills to design chairs and seating. The Year 12 and Year 13 students have been drawing concept designs in 2D and will be using these skills to draw their design developments for their product designs.
Success Criteria
Using SOLO

Uni
structural
Multi
structural
Relational
Extended abstract
To understand the basic structure of isometric and be able to construct basic / simple shapes.
To be able to construct a range of simple shapes and combine them to make more complex shapes.
To be able to use crating to construct complex shapes and curves in isometric.
To use isometric skills to draw own design ideas, showing different views.
Links with the New Zealand Curriculum
Level 1
Curriculum Level: 6
Learning Area: Technology
Strand: Design and Visual Communication
Achievement Objective: Outcome development and evaluation
Critically analyse their own and others’ outcomes to inform the development of ideas for feasible outcomes. Undertake ongoing experimentation and functional modelling, taking account of stakeholder feedback and trialling in the physical and social environments. Use the information gained to select, justify, and develop a final outcome. Evaluate this outcome’s fitness for purpose against the brief and justify the evaluation, using feedback from stakeholders.
Achievement Standard: AS91067

Level 2
Curriculum Level: 7
Learning Area: Technology
Strand: Design and Visual Communication
Achievement Objective: Outcome development and evaluation
Critically analyse their own and others’ outcomes and evaluative practices to inform the development of ideas for feasible outcomes. Undertake a critical evaluation that is informed by ongoing experimentation and functional modelling, stakeholder feedback, and trialling in the physical and social environments. Use the information gained to select, justify, and develop an outcome. Evaluate this outcome’s fitness for purpose against the brief. Justify the evaluation, using feedback from stakeholders and demonstrating a critical understanding of the issue.
Achievement Standard: AS91342

Level 3
Curriculum Level: 8
Learning Area: Technology
Strand: Design and Visual Communication
Achievement Objective: Outcome development and evaluation
Critically analyse their own and others’ outcomes and fitness-for-purpose determinations in order to inform the development of ideas for feasible outcomes. Undertake a critical evaluation that is informed by ongoing experimentation and functional modelling, stakeholder feedback, trialling in the physical and social environments, and an understanding of the issue as it relates to the wider context. Use the information gained to select, justify, and develop an outcome. Evaluate this outcome’s fitness for purpose against the brief. Justify the evaluation, using feedback from stakeholders and demonstrating a critical understanding of the issue that takes account of all contextual dimensions.
Achievement Standard: AS91630
  • Thinking
  • Using language, symbols, and texts
  • Managing self
  • Participating and contributing
Prior knowledge

Level 1
The Year 11 students did a Jump Start course at the end of last year. We went over some of these skills then so this should be a refresher. There are a few Year 11 students who were not on that course so this will be new to them.

Level 2
Some of the Year 12 students did Level 1 DVC last year, so this will be a refresher.
Some of the Year 12 students did not do DVC last year so this will be new.

Level 3
Some of the Year 13 students did Level 2 DVC last year, so this will be a refresher.
Some of the Year 13 students did not do DVC last year so this will be new.


Lesson Sequence

Session 1
Student Activity
Teacher Activity
  • Round the front table watching the screen as the teacher does the demonstration.
  • Use the drawing board projector to demonstrate using the isometric grid under the plain paper.
  • Simple straight line shapes to start with.
  • Combining shapes together.
  • Use of crating to produce more complex shapes.
  • Guidelines to produce curves and ellipses.
Session 2
Student Activity
Teacher Activity
  • Practicing the shapes and techniques shown by the teacher.
  • Repeat the shapes and skills to improve their skill level.
  • One to one help and support as needed as they work.
  • Small group and table demonstrations on individual techniques as needed.
Session 3
Student Activity
Teacher Activity
  • Produce your name / initials in isometric - use the supplied block lettering sheets of needed to keep the letters simple.
  • Individual help
  • Ideas for what letter might look like.
  • Project isometric grid on the board to demonstrate to whole class what ideas might look like.

Resources


Isometric grid paper - to be printed off
Plain A3 paper
Drawing pencils
Next Steps

Students will create their own step by steps using either the drawing board with the webcam, the iPads or photographs of the steps - to create either videos or presentations with steps.
Reflection and Analysis

What went well?
The students were engaged on the skills activities for the whole session. The breakdown of the skills into small chunks that they could practice before we moved on worked well as they could build their knowledge slowly and not have too much presented to them at once.

What did not go so well?
The students find it difficult to visualise what they are going to draw before they draw it.
Some students find it hard to follow the grid lines and still draw lines that go in the wrong directions.


What can I do better?
I had purposefully not done my own rewindable elements for these skills as the next thing I want the students to do is to make their own. I had included a link to an isometric drawing video on YouTube on the class communities for them to refer to if they wanted.
In hindsight, I think it would have been good to have one made by me for them to refer to on the day.
To help with the visualising of what they are going to draw, I could make some 3D shapes (on the 3D printer / made on card etc) that they could look at and hold in their hands. This may help with understanding the shape before drawing it.
Having an example sheet with the shapes already draw in isometric on there so the students can see what the shape is that they are aiming for might help them to understand the direction needed for all the lines in a shape.


Learning Content

This is a video of one of the skills, recorded at the time. It was recorded on the drawing board projector using QuickTime.


This is the set up of the drawing board projector used in the lesson :-


This is the ongoing lesson


Resources for the lesson :-


Isometric Sketching
Level 1 Community
Level 2 Community
Level 3 Community

Isometric grid paper - to be printed off
Plain A3 paper
Drawing pencils

Student created work
This is the work that the students created today from the skills we covered.

Tuesday, May 9, 2017

Nothing is ever all good news....

Nothing is ever all good news....  and anyone who says otherwise is not being totally realistic.

This was the plan for my NCEA Level 1 group at the start of the year :-

The first standard was supposed to be complete before the end of term 1 so they students could have those 4 credits. 
At the end of last year, the Year 10 students moved onto their NCEA level 1 courses for 4 weeks. This was the Jump Start initiative that the school had started. My group of students did really well and settled to the work and tried hard. At the time, it was just me and them as the rest of the senior students had left school to do their NCEA exams.
When they got back this year, the class had changed a lot and we are now a mixed group of Year 11. 12 and 13, doing NCEA Level 1, 2 and 3. This went part way to inspire my inquiry this year, which is to support mixed level NCEA classes.
My Level 1 students have not coped very well in this this environment and none of them have completed that first standard yet, and we are in week 2 of term 2.
As it is the whole group of Level 1 students who have not achieved yet, then the blame is firmly at my feet and there is no point in making any excuses about it ( mixed class, too many students...bla bla bla)

So...what am I going to do about it?
  • We ( the Year 11 students and I) have had a chat about the situation, where they are, where they should be and we have been open and honest about it. My managing of the situation in the class and their reaction to this situation.
  • We are trying a plan - one lesson working on this standard, one lesson working on the next standard alternately. It is a worry to get behind like this as it has a knock on effect on the plan for the standards for the rest of the year.
  • Targeted support and help from me, one to one where needed, skills, access to what they need in the classroom as a priority over the other groups.
  • After school sessions ( Wednesdays and Thursdays) till they get caught up.
  • We had a talk in our PLG meetings last week about students we were worried about and I compared what my students were doing against how they were doing in other classes. I talked with another teacher of one of my students to come up with strategies. They agreed to talk with that student, who was doing really well in their class, to see if there was anything wrong that they weren't telling me.
The students seem to have responded well to this and are working steadily. We have made a start on the next project too, which is making me sleep a little better.
We shall see how this goes and then maybe have a chat about the orthographic work that I had originally planned for this term. This is a second external which is worth 3 credits. There is an external in the plan which we are always working on, the freehand sketches, so if we decide to drop the orthographic to get more time this term, we will still have access to 25 credits.


No, it is not ideal, but a plan is just that and is has to be able to be flexible and be able to adapt to the reality of the classroom as it happens, in the best interests of the students. 
It is not about teacher ego at this point. It is about accepting what is happening and adapting the plan to cope.

Monday, May 8, 2017

Reading - First Steps with SOLO Taxonomy

I have been reading my way through First Steps with SOLO Taxonomy.
I bought the package deal from Essential Resources, where I got a link to download a PDF, so I can read it on my device and a nice physical copy was delivered in the post too.

It has a great deal of very useful, structured ideas with lots of things that can be used in the classroom straight away. It also explains very clearly, how and why things work and why they are set up like they are.

What I became particularly interested in on the first read through was the describe charts. I focussed in on these as this is what my Year 10 and Year 12 students are doing at the moment in the their design projects. They are involved in product analysis.

I had made an extremely simple describe chart on a Google Drawing, which basically kept the students in the unistructural / multistructural area. This was a good starting point as it got them thinking about the characteristics  / attributes of the products they were looking at.


What I have been reading about in "First Steps with SOLO Taxonomy" are multi layered describe charts that give the students access to much higher levels of thinking while they are describing their products.

I have used Google Drawings again to convert what was in the book to something that I can use in the classroom.
It is based on this diagram from the HookED website.
I like how, as the diagram goes out, the complexity and depth of thinking builds. 


This also was linked to a self assessment tool for the students to use. This is great for them to see exactly where they are in the process without having to be told by someone else.
Link here to this diagram on a Google Drawing.
I added in the evidence column so the students can make a copy of this a put links in that column to where their work is.

This book is proving to be an extremely useful buy, so I have ordered another one to go with it.
SOLO Taxonomy - A Guide for Schools - Planning for Differentiation.
This looks like it will be great for my mixed level classes at NCEA, so I look forward to it arriving.

Friday, May 5, 2017

Inquiry Update - One Term In


We are one term into this year, and it is time to assess where I am up to with my inquiry.
After our last Manaiakalani CoL meeting, this inquiry structure was presented, so I am assessing my inquiry against this structure to see where I am at.


Inquiry Item
Explanation
Evidence
Learn
Focusing Inquiry - “What is important (and therefore worth spending time on) given where my students are at?”
Gather evidence
Student achievement data eg. standardised tests, OTJs, internals and externals
Anecdotal evidence eg. observations, formative assessment tasks, student voice,  parent voice, previous teachers, surveys,  learning walks and reciprocal visits
Student Input into planning


Scan
Wider perspective on learning not just aspects that are easily measured eg considering perspectives of our young people and their whānau. How engaged are they with learning? Can they describe what they are learning and why it is important?  (AfL) Links to Key Competencies

Identify Trends
Looking at all the evidence, thinking hard about its “shape”. Noticing where there are cohort trends that extend out beyond the class, to the team or department, maybe even for this school across schools in the CoL
Clearly identifying the common learning challenges or problems.
Looking for and identifying strategies that are known to have the greatest impact on on this/these challenges


Hypothesise
Analysis and interpretation often take place in the mind of the teacher, who then uses the insights gained to shape their actions as they continue to work with their students. These theories for improvement should connect with the inquiries related to the Achievement Challenge of the Department/Team, the School and the CoL.

Research
“This involves asking questions about how well current strategies are working and whether others might be more successful. Teachers search their own and their colleagues’ past practice for strategies that may be more effective, and they also look in the research literature to see what has worked in other contexts.”

Reading - Analysis of asynchronous online discussion using the SOLO Taxonomy


Reflect
“Inquiry into the teaching–learning relationship goes hand in hand with formative assessment, in the cyclical evaluation process that goes on moment by moment, day by day, and over the longer term.” Assessment-in-the-classroom/Teaching-as-inquiry


Create
Teaching Inquiry - “What strategies (evidence-based) are most likely to help my students learn?”


Make a plan
What can I already do and  what do I need help with?
Who are the learners? Group/class
What are the goals for my practice and student achievement?
Set up processes for capturing evidence about whether the strategies are working for my students.

Try new things
It is a constant state of action, monitoring, reflection, and adjustment - and then more action.
Failure may occur.
Feedback from learners - how will I engage them with new learning? Do they know we’re trying something new?  


Innovate
Are we capitalising on the affordances of the technology to support the Five Affordances of Learn Create Share (Engagement, Teaching Conversations, Visibility, Cognitive Challenge, Scaffolding) identified by the WFRC

Google Plus Communities

Implement
Just do it!


Reflect
“Inquiry into the teaching–learning relationship goes hand in hand with formative assessment, in the cyclical evaluation process that goes on moment by moment, day by day, and over the longer term.” Assessment-in-the-classroom/Teaching-as-inquiry
Main Blog - links to topics across the top
Share
Learning Inquiry - “What has happened as a result of the changes in teaching, and what are the implications for future teaching? ...We need people to provide us with different perspectives and to share their ideas, knowledge, and experiences.”
Publish  
What happened as a result of the changes? Share evidence (artefacts of student learning, DLOs) and effective strategies.
Main Blog - links to topics across the top

Google Plus Communities

Co-teach
What if my plans didn’t work? Are there different approaches?Who can help me? Peer observations, video analysis of my practice.

Model / Guide
How can my findings and experiences support my peers? How is this shared?
Main Blog - links to topics across the top
Feedback / Feedforward
What are my next steps? How will I sustain effective practice? Learner feedback? New goals?


Reflect
“Inquiry into the teaching–learning relationship goes hand in hand with formative assessment, in the cyclical evaluation process that goes on moment by moment, day by day, and over the longer term.” Assessment-in-the-classroom/Teaching-as-inquiry
Main Blog - links to topics across the top


Thursday, May 4, 2017

Starting my new Year 10 group off with SOLO activities

My new year 10 group have made a start on their project for the term. They are going to be designing and making a model of a portable speaker. This will give us the chance of going though nearly the whole process that they would be expected to do at NCEA Level 1 so they know what to expect if they choose my subject for next year.


The first thing that I got them to do was an individual activity. Find a picture of a portable speaker that they like and describe it using this describe diagram.


Here is an example from one of the students who completed this activity.


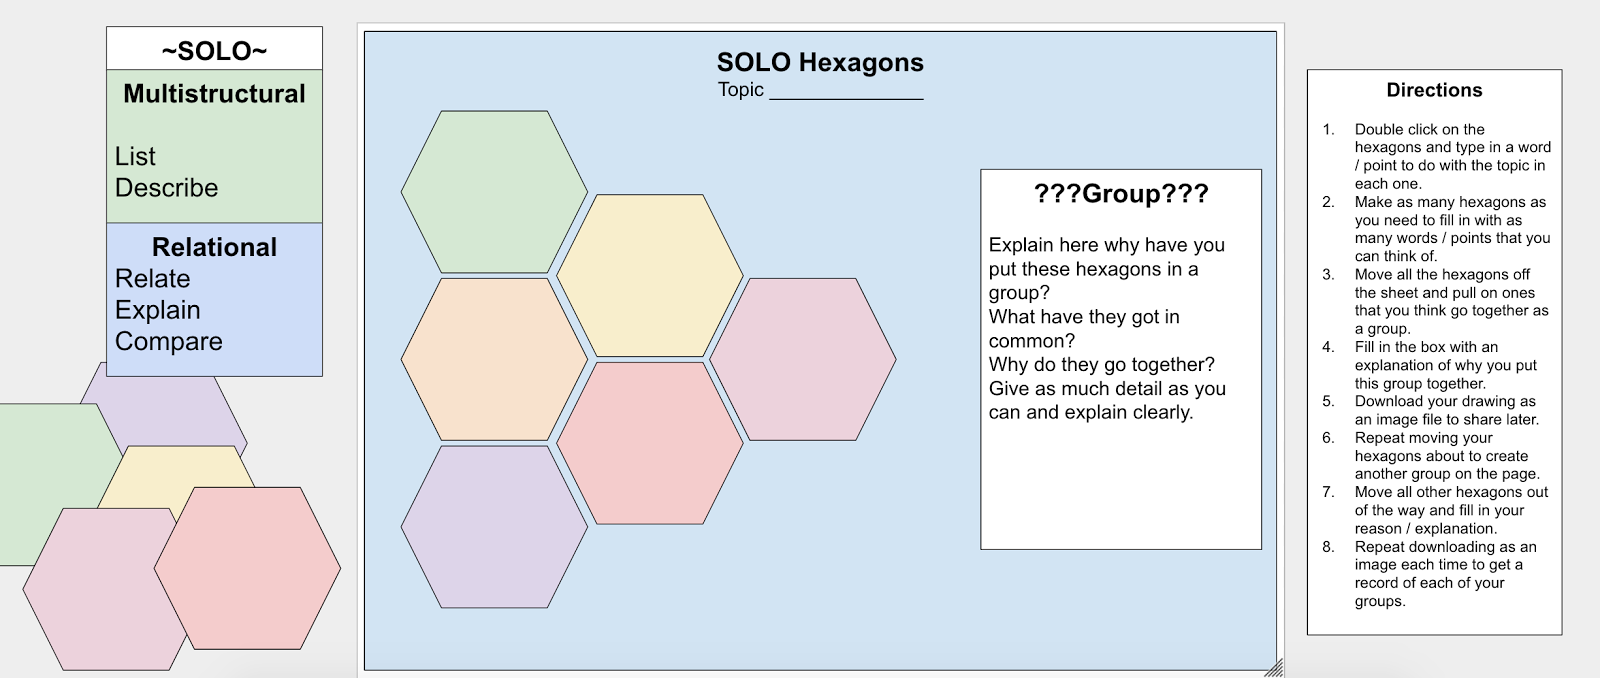
This was to prepare them with lots of ideas that they could add to the next activity where they had to work in pairs to do the SOLO hexagon work.
I decided this time, to do this activity using the Google Drawing template that I had prepared. I have to admit to missing the usual paper and scissors and mess though!!
Here is the template that I shared with them.


The students had to write up all the elements that they could think of to do with the topic then put the groups together and write an explanation of why they decided to put those items together.
They did this in pairs so they could use each others ideas and come up with reasons together.
They then had to take a download image of their work and share it in the class community. They had to do this 3 times with different groupings.

All of the work that they completed has been shared in the class Google Plus community.
This gives all the students a chance to see what everyone else is doing, so if they miss work or get stuck, they can have a look there. It also gives them chance to see the feedback that I am giving each item of work as I am doing it in the comment section under the post. They can also use this feedback to improve their own work, even though it is not specifically about theirs.

Most of the class worked well at these activities except a few who used small group / pair work as an excuse to do "not a lot".  I suppose you will always get some of them.
I have had good feedback from my Year 12 students when I have given them a chance to work on some elements in small group and pairs so I am hoping that by filtering this way of working down to the Year 10 students, they might feel more confident about the subject and consider it a possibility for next year.

Wednesday, May 3, 2017

Getting to know my new Year 10 rotation group.

It is that time of the year when the Year 9 and Year 10 Technology rotations change and we get new groups. While it is good to see a range of students over the year so more of them get access to my course content, it is always tricky getting to know new classes when they are already established as a group and have got used to their timetable as it was.

My first lesson with my new Year 10 class  was yesterday, so we did a getting to know you exercise using Google Drawings.
I had this up on the board, with examples of what they could say about themselves and an example that I had made about me.
I also used this as an excuse to fit in some top tips for searching for sizes on Google images and how to get transparent backgrounds in a search.


It has given me an interesting insight already as to how the students like to do their work. Some are neatly laid out, some use borders and colour, some use grids for the layout.

Click here if you want to see all the creations that I have stored in a folder ....