Thursday, April 17, 2014

Wednesday, April 16, 2014

Analysing Design Applications

I took the second day today of the 8 Manaiakalani research days that I can have this year.
I decided to use it to try and assess and analyse some online design apps and I decided to get a small group of students to help me to do this.

I sent them all this document with a selection on online programmes and chrome apps for them to test and try out. They had to try and design something with these tools and see how easy they were to use.
Link to document

Between them they had Asus netbooks, Samsung chrome books, and we used PC desktops and Apple desktops.
They had to see if the apps we were looking at could be used on a variety of devices to make sure they were useable for lots of different situations.
Here is a link to the students' analysis sheets that they filled in as they went.

Here is Fiu, being comfortable on a beanbag set up on 3 chairs, testing out the same app on a desktop and a netbook.


In the afternoon, we decided to try out some iPad apps.
Here are the ones that were tested and tried out :-
Homestyle 3D

A big hit was the Tayasui sketches app as it was easy to draw with and very realistic looking when you are sketching.
Doodle Buddy was popular but maybe not detailed enough for the higher levels in design work.
Autodesk always provides good design tools and it is good to see them available in an iPad format.

Overall, a very productive day with some good outcomes and some disappointments. A key question came through. How can a really good app like 3D Design Something, which we all rated as really good and easy to use and is totally online, not work on the netbook? Frustrating.
The iPad app test has made me want to use the iPads in DVC so I need to go shopping for some stylus pens.


Mino and Jarna working hard
Nathaniel trialling apps and giving feedback

Pizza for lunch. Have to feed the troops...


Sunday, April 13, 2014

Quality Feedback to Aid Planning...

While designing the online course trial module, it was definitely a different planning experience. I tried hard to think of all possibilities so that I could make resources to cover every thing.
The trial module went live today and one of my students has made a start on it.
I have been getting some quality feedback from him already, via Google Plus, which has helped me to improve the experience for the others when they start.

Saia had uploaded his architect photos to a Google Plus album and I gave him some feedback that a wider range was needed and to make the album public, as he had shared it privately. I need all of this online work to be public so it can be moderated.

When Saia  acted on this feedback, I noticed that he had made a new folder rather than change the one that he had already made.


When he started his new folder, I asked if more help videos on the online task were needed.
So I made a couple more to cover  changing the sharing settings of an album you already have and how to add more photos to an album you have already started.
Saia has already been adding more photos to his album since so this is going to be helpful to the others in the test group when they get that far.
It is hard to think of everything that might crop up and it is really useful to have students who are willing to give it a go first and not be shy to give some helpful feedback.


It is good to see that he is using the tracking sheet system. It makes it really easy to see an overview of where he is up to at any given time.


Friday, April 11, 2014

Planning to be Not There......

I took the first of my 8 support days today and I focussed my time on planning the online Level 1 module.
It was a very productive day, with making screencasts and instruction sets for all the tasks that make up the project.
It is definitely a different thought process to plan a course where the students do not get me to show and tell them what to do in person. I have tried to break it down into the chunks that I think make it clear to understand and I will see how effective that is when my trial set of Year 10 students work their way through it. Nine members of my Year 10 tutor class have agreed to trial it for me when it is ready. The payoff for them is that they will get 4 Level 1 credits out of it while they are still in year 10.
I went into work today even though I was off timetable to do this as I knew that I would get more work done there than at home, but the tricky part was finding somewhere quiet enough to make my screencasts. I made the decision not to make each screen cast too long ( none of them are over 4 minutes), so if there was more to cover, I split that section up into two parts. I did this so the information is in bite size pieces that can be easily covered in a short time. The students are doing all of this in their own time, so I did not want to make each section in each task a long painful process that would put them off going back.
The key points from me doing a MOOC with Future Learn that I wanted to include are :-
  • Small chunks  of information in the form of video
  • Visual tracking of progress
  • Community / forum support

For the tracking, I have used a Google spreadsheet that the students will change the colour of each task as they go along. They will embed this on the front page of their Google site so it is the first thing that they see when they go back to their work.
I have set up a Google plus community for the forum support element that is needed in the online course, as I have used this with my classes already this year and it is proving very effective to support their writing.
Of the 10 tasks in the project, I have completed 7 of them so far and I really need to finish the others over the weekend as I want the students to have access to this next week so they can make a start over the 2 week holiday if they want to.

I am really looking forward to them making a start and seeing how it goes.
I have warned them that I will be sending them regular Google forms to get feedback from them about how they are finding the process.


Update - Sunday 13th April
I completed the tasks today, I have had it checked over by a couple of fresh pairs of eyes and I have sent the link to my 9 guinea pigs.
I have to be patient now.

A bit later on Sunday....

I have a had a bite. I have been getting excited watching one of my students enrol, start his folders and site and share things with me, then watch him make his site ready to go, use his tracking sheet and decide which architect he is going to research. 
I need to stop stalking.


Sunday, April 6, 2014

My Own Learning and Planning by Doing......

When I plan a project for DVC, I have always  drawn and made all the things that I am expecting the students to do. This serves multiple purposes for me. It helps me see the steps that need to be taken to complete the process, it lets me see where the bumps in the road might be, it helps me plan materials and equipment needs at different steps in the process and it gives me examples to show the students at the start of the project. I find that it always helps the students to see me actually do the tasks in front of them too. It lets them see the skills and processes in action, and it lets them see that I can do it and not just talk about it.
As an aside, I tend to do my drawings etc, in the staff room where I can join in chat while I work rather than sit by myself in my own classroom (I really don't like quiet while I work). I am always surprised by the number of staff members who walk past what I am doing and say things like "it must be nice to have the time to sit and do things like that". Seriously! So are they telling me that they do no planning and examples for their students? A colleague who knows of my frustration about this happening has taken to walking past and saying "colouring in again?" just to wind me up !! Anyway, back on to the topic....
With my research into blended learning, I have decided to follow the same process that helps me to understand what the students have to do and actually try it myself.
I have signed up for Future Learn. This is a MOOC mostly owned by the Open University, but they are partnered by a large list of Universities. Link here to Wikipedia with a brief explanation.
Here is an article in the Guardian about how this is changing the way people learn.
It was really easy to sign up for, an email and a password to set it up was all that was needed and I was in browsing their courses.
I have signed up for one called "The Mind is Flat" from the University of Warwick. It is a 6 week course and I am starting late as they have already been going for nearly two weeks. I didn't mind this as I thought it would give me a good insight into starting late, working at my own pace, catching up etc.

The Process

I signed up yesterday and I am in the process of working through the work from week 1.
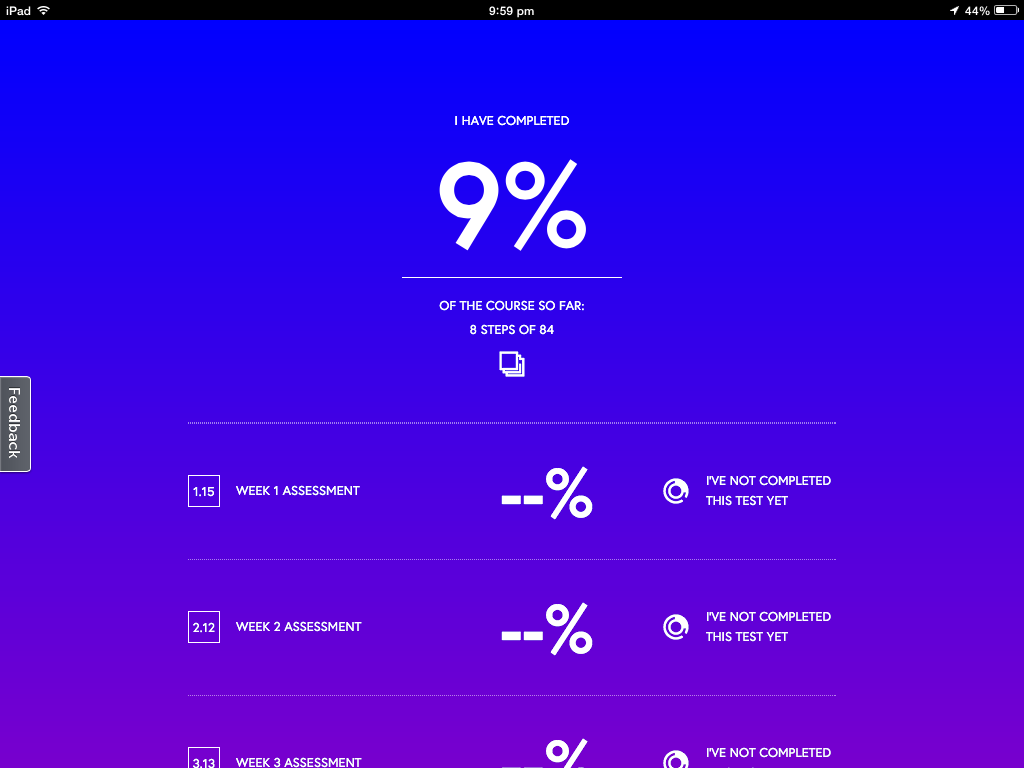
When you log in, you see a screen that lists the courses you are signed up to.
I only have one here are this is all I am signed up for at the moment. It gives you a coloured graphic of where the course is up to and where you are up to on it (the blue parts are the bits I have done so far).


When you click onto your course, it is broken down into steps that you work through in each week. You can click back into weeks to look at what you have already gone through and to catch up, and you can click forward to see what is coming up in later weeks. As you work though each step, the colour changes from pink to blue so you can visually see where you are up to in the steps. These steps are a mix of discussions, articles and videos.


The videos that I have been watching so far are clear to hear and understand, with the lecturer talking to you against a plain background so there is no distractions. It lets you know how long the videos are before you play them so you can plan your time accordingly. Underneath the video is a download link so you can get a pdf of a transcript of what was said in the video. There is also an area to add comments as you are encouraged to discuss what you have seen in the video. To be honest, I found this quite intimidating as there was over 500 comments on some of the videos and as usual on the internet, it becomes an excuse for some people to show off about what they have read, disagree with the video that they have seen and generally be on their own box.
Once you are happy that you have completed a section, you click the pink "mark as complete" button and this then changes your progress colour to blue so you can see where you are up to when you log in next.


You can keep a check on your progress on this screen, where it tells you how much you have completed and any marks for tests that you have done. 
I have been going through all the steps on my iPad up to now, but you can do them on any device as you just have to log into the site on a browser. 


So what can I take away from this?
  • Progress on the course being visual and easy to keep up with.
  • Each week being broken down into small steps.
  • The videos are clear and easy to understand.
  • The videos are not too long each time so are easier to take in the whole thing.
  • The timing of the videos being stated before you click play so you know how much time to give them.
  • The transcripts of the videos being available to read afterwards. This is good with different accents, understanding etc might make videos alone not very accessible.
  • The chat / discussion / forum area of each section is a good idea but for younger students this needs to be more structured than just an open area. A particular focus for discussion needs to be put in place but I like the idea of the students on the course helping each other.
I have not got to the part where there are activities and tests yet.

Questions...

With the timetabling constraints within a secondary school, there are always students who would like to take my course but the timetable clashes with another subject.
Would I be able to set up an entirely online course for these students?
I feel that I would have to meet with them still to give face to face support on things they were unsure about, and it would have to be after school. How often would be enough to support an online course?
Would this give students the opportunity to gain more credits without it taking time and options off them during the school day? 
Would I be able to explain and support the skills needed in DVC enough for the students to produce work of a suitable standard?
How would students submit drawn work? 
Would the online students have to come in to the DVC room to use equipment? When would this happen?

I am fascinated by all these questions and I think my next step next week is to talk to particular students who I know did not take my course again this year due to timetable constraints, and see what they think.


Friday, April 4, 2014

Design Words

My students have to use the correct design language when they are talking about, and analysing their work. They have to know about the main design principles and elements that they have used. It is always the weakest point of the process, so I have made a collection of the words we need to use the most and tried to illustrate them and explain them as simply as I can.
Maybe in between projects, or as a break mid way through a longer project, they could make their own design words pages with their own definitions on them. I have made these on PicMonkey, and the students all know how to use that programme. I have to be able to get them to start using these words in a more natural and less forced way, then when they get to the notes and analysis part of their work, it flows more than it does at the moment. Maybe they could have a ongoing slide show of their own embedded into their DVC portfolio sites and keep adding to it as they learn more words and meanings.

Tuesday, April 1, 2014

I'm a Monkey Lover I am !!!

I am becoming an increasingly bigger and bigger fan of Pic Monkey. I subscribe to their emails, blog and follow them on Google Plus. The blog is an endless source of tips and tricks, and yes I know it is trying to sell me something too, but the graphic design information, tutorials and tips are great.
So I had a plan to try and use PicMonkey to design the pages of a book. I started out small and I am making pages about design terms, then I can use it with all of my classes.


Adding textured backgrounds, my own images in overlays, choice of fonts ... I am really enjoying this. I decided on a square format for my book, as this is less formal than a rectangular set up. The design option on the top of the PicMonkey front page gives you plenty of options.


When I am happy with my pages, I am saving them as image files which I am then putting into Adobe Acrobat Pro to create a single PDF with the individual files.
An example of an online app that does this is linked here... Convert JPG to PDF.net


The next step was to get the book into a format that is viewable on a site. I have used Flipsnack before so I decided to try this out to see what my book looks like.
I haven't done many pages yet as I was too excited to see what it looked like. No patience!!
I am pleased with the result and am happy that it is so easy to do, so when I get students onto this, they can concentrate on the content, not a really complicated sequence of events.


So now I need to stop blogging about it and get on with finishing the book!!!!
Now what can I get my students to make???.....
Level 2 students could create a book about their Art Deco research instead of a slide show?
Level 1 students could create a book about their chosen architect rather than a poster?.. They could still use Adobe Illustrator skills to create the image layouts.
My year 10 students could do the layout planning for their children's books like this.
The good thing is that it is an online app, so available where ever the students are online, the students are all familiar with it so there is very little lead in to the production and they don't need me to be there "guiding" them all through it. They can make all their pages the then the book "production" is really quick and easy.
Lots to think about....