Showing posts with label SOLO. Show all posts

Monday, March 31, 2025

Using Graphic Organisers in DVC

 In our PD sessions on Monday mornings, we have had 3 about literacy and how we can use graphic organisers to help students with understanding what they are reading. Session 1 , Session 2, Session 3.

I am a big fan of graphic organisers and have been using them for quite a while with my Year 11, 12 and 13 DVC classes. I am also a big fan of using SOLO taxonomy to structure support documents for students so any graphic organisers tend to use SOLO quite a lot. Link to recourses

Here are some examples of student work that has been done this term using graphic organisers. (I have made copies of them so the name of the student is removed)

Year 12 Examples

Compare and Contrast - this is the template that I give to the students to compare their chosen design era with another one.

Link to template

Link to support on class site


Here are 2 student examples

Link to drawing


Hexagons - this is the template that I give to the students to group together all the same aspects of their chosen design era.


Here are 2 student examples


Link to presentation


Timeline - this is the template that I give to the students to see where their chosen design era fits in with those before and after it.


Here are 2 student examples


What I really enjoy about these is how my students not only use them to support their research but they make them look their own way too.


Wednesday, September 28, 2022

Reading - Information Transfer

 As part of our Technology PD on Literacy, our literacy coordinator, Marc Milford, has been taking us through some reading strategies. This is a key part of the inquiry focus and goals for the school and cluster which is around reading. 

Marc shared a template that he has been using in the maths department where they took the problems apart and transferred the information into a grid. He wanted us to have a go at using this method with our subjects. As my Year 11 and Year 13 students are mostly at a point in their project work where they have to find information about different materials that they could use in their designs, this was a perfect topic to use.

As I have previously done a lot of work involving SOLO Taxonomy and writing, I decided to structure my reading exercise around SOLO too. 

Link to previous SOLO work

Link to SOLO resources

Link to document - the last page was added in response to feedback from Marc as he wanted links to key words and visuals. The Y13 class did this exercise today without the last page and it was added for the Year 11 group later in the day.


Here is some of the work completed today by the students. There is only one completed one from the Year 11 class as we only had a single period right at the end of the day.

Year 11Year 13
Student 1Student 1
Student 2
Student 3
Student 4

Some feedback that I received from one of the Year 13 students was that i need to improve the last two columns so the instructions are clearer. (the purple columns). This is where I am wanting them to apply what they have been reading to their own design ideas. She was correct. I do need to structure and support those two parts better with more and clearer steps / questions.


Friday, July 30, 2021

Changing what doesn't work


My year 12 group have been looking at specific design eras and one of the things they have to do is talk about how things that were happening in the world at the time affected the design of the time. This has always been a particularly difficult part of the work for this standard

I had been using the cause and effect templates on this page on my class site. I had given them links to news articles from different time eras (down the bottom of that site page), and I have given targeted help, with readings from 2 particular design eras as they were the most popular this year. I knew that this had been giving issues in previous years but decided to stick with it this year.  Below here are examples from 3 of the students in that class. You can see that they used the template to collect information but did not make the connections that they needed to make to the design that was happening at the time. 

It was time to accept that it wasn't working, suck it up an do something different. 

I am a big fan of using SOLO Taxonomy structured templates so I decided to have a go with using a SOLO hexagons activity so the students can collect together seperate items of information and then group them together and form connections.

Here are some student examples and as you can see, they are starting to make much better connections between all the information they are collecting with their readings. (they had the same links to readings from the previous version of the exercise, but they were using the information in a different way)

So what have I learned from this? To trust my gut when I am sure something is not working. Throw it out and move on with something else. 

Friday, July 31, 2020

Multi Lingual Literacy Support with SOLO

In my inquiry group there are three Filipino boys. One of them has very good English, one Ok and one not so good. There is a lot of translating that goes on between them when they need to understand my lesson instructions, which is great, but I cant have that responsibility on them when it comes to the written analysis that they have to do for their design ideas.

This is a continuation of the multo lingual literacy support I started with my Year 11 class. Blog post here.

This is the support sheet I have put together for the notes that have to go with their design developments. It is structured around SOLO Taxonomy so they can see how the structure is supporting how they are analysing their work.

Here is where it is on my class site with the other literacy support documents I am putting together.


One of our teachers is also Filipino and she very kindly agreed to translate this for me so I can give two of the boys especially, this work to do in their own language.

Here is the updated, translated version. The boys will get this on Monday. I cant wait to see what they think.


Thursday, July 2, 2020

Multi Lingual Literacy Support

My Year 11 class is a mixed lot. 4 of them are in Mrs Latu's ESOL class. The 4 girl's drawing is great and they work really hard. The problem was coming up where they had to make sure their written work was up to date and also write analysis of their own design ideas.
Their teacher, Mrs Latu, was very keen to help them complete work in their different classes so they can start clocking the credits in. She has been gong to their Art class and has been coming to DVC to help the girls understand what they have to do. She has also been having them in her own classroom during DVC time for intensives.


A big part of what we have been working on is multi lingual support for the girls. I have been to ask Mrs Moore, our NZQA person, if the notes the girls write have to be in English. In light of this conversation, we decided to make multilingual support for writing available and the girls can write their analysis in their native languages. This can happen as long as Mrs Latu and Ms Fepuleai read the notes and sign off on the external posting envelope.
So, thanks to the efforts of Mrs Latu and Ms Fepuleai, I have my first set of multilingual writing supports for the girls.

Here is the original, based on SOLO taxonomy.

Chair Concepts - Architect Notes
xxx


Describe
The shapes and forms you have used in your designs.
The shapes and forms used in the buildings your architect designed.

(tip - shape is 2D and form is 3D)

Explain
How you have used the shapes, forms, texture and patterns from your architect have been used in your chair designs.
Why you chose the shapes for the design and the effect that has been achieved by using these shapes.
Analyse
How you have reflected the style of your architect in how you have designed your seating.

Reflect
On which parts of your designs show the style of your architect the best and why.

Examples

I have used ………….. shape / form in this design.

The shapes / forms in my architect’s work are………………..

The ………….. Shape / form is seen on …………….. building

I used ………………………… from the ………………...building as the main inspiration for this design. I chose this shape because it shows ………………………. about my architect’s work.

The style of my architect is ……………………… and I have reflected this in my design by ………………………………….


Here is the Tongan translation version
Here is the Samoan translation version


I have printed out all of these, given them out to who needs what and they are currently using these templates to help them with the notes on their design concepts.

My examples are here. They had to go from looking at the forms used in their chosen architects work to using this information to design seating and chairs.

This is for AS91067 leading into AS91068
Link to class site


Tuesday, November 5, 2019

Product Design using SOLO Taxonomy

I am busy putting together all my planning for next year so that I can get it all moderated and ready to go in the new year. I am currently working on the product design project for Year 12. They need to look at existing products and analyse them so I have structured this around the SOLO Taxonomy levels. This task then starts with some simple labelling and identifying and slowly builds the complexity of the questions to add more depth as they go.
I am hoping that if this is a smooth process for the students, then we can do something similar in structure along with all the literacy structure for the analysis of their own design ideas. This is the part that they always find difficult and I am constantly working on trying to improve.


Friday, March 1, 2019

Trying the blogging template with my intermediate classes

As part of our department goals this year we want to get more stuck into blogging with the students.
To help with this, we are having regular PD sessions together to focus on strategies to use in the classroom to support the students to blog about their Technology work.

After out first PD session, I altered the template so I could use it in Graphics ( blog post here ) and out homework was to try the template with our students before the next PD session.

I have given it a go with my 3 intermediate classes this week.
Here are links to some of their posts.

3D Oblique Sketching


I projected the template on the whiteboard and I also shared the template directly with the students so they could see it on their screen and refer to it.

After a little confusion when I did this with the first class, where a couple of the students made a copy of the template and started answering the questions on the document rather than their blog, it went quite smoothly.
I need to give them a little more time in the lesson in order to complete the blogging task as they did not all complete it and they finished it up when they got back to their own schools.

Thursday, February 21, 2019

Technology Department Blogging PD Session

Today, the Technology department staff were lucky to have a presentation from Carol Heka, our food technology teacher. She was explaining how she includes blogging into her planning for her lessons for juniors and intermediates. Her blog post about it is here.
This is part of our department goals this year.

This is the template that was provided today as a starting point. We want to structure what the juniors and intermediate students blog about instead of just putting their work on their blogs with no explanation or analysis.


I took the starting point template and added extra things that I thought would be good for the Graphics lessons.
Link here


The plan now is that we try these out with our students and feedback in our next blogging catch-up session in the department in a couple of weeks time.

Thursday, June 14, 2018

Continuing the Literacy Display in my Classroom

As part of the display on my back wall, which started with the literacy breakdown work I have been doing with the school literacy specialist, Mr Marc Milford, I am adding some things about paragraph focus ideas and SOLO taxonomy.

The first one is this paragraph burger, which is adapted from the Writing Book and part of the SOLO Taxonomy thinking charts that I have been putting together.

Link to document here
I want the students to be able to use the structure we have been working on, which is highly visible on the back wall (a 3ft x 5ft poster!) and look at this poster for ideas on what they could write about.


The other thing that I have been working on for this display is a structure that is based around SOLO Taxonomy too. This one will be shared directly to the students to have in their drive too so they can use it as a template and starting point for their writing.
I have put the structure on the drawing and instructions around the outside so when the students use it and embed it in their work, the instructions and support will not be seen.
The colours on this document relate to the colours used on the SOLO posters that are in all of the classrooms.

Link to document here


Monday, May 21, 2018

Description Burgers

I have been doing product analysis exercises with my Year 11 students all together on the board. What I want to move on to is using sentences rather than stand alone words and comments. We have been reading the exemplars from the NZQA website about the standard we are working on so the students have more of an idea about what the expectations are.
I have been putting together lots of useable worksheets and activities about using SOLO Taxonomy for a while now so I thought I would adapt one of those to use.

I have a blank description burger on a Google Drawing that I thought we could adapt and use for product descriptions. I adapted this burger drawing from one that is in The Writing Book.
I used this to make an example to show the students and take them through the process.


After talking to Cheryl (the school's specialist classroom teacher) about my plan and showing her my initial scribbles on paper,  she gave me some great links and ideas that I could include.
One of these was this document, the Q-matrix, with focus questions.


I used this to help me put together this support document for the students, where they could take questions from here to help them when doing their own burgers.


I put all of this support material into the class Google Plus Community so it was easily accessible. I also supplied 3 simple images that they could choose from for their descriptions if they had trouble deciding on one for themselves. As usual, too much time was spent on this decision than the important parts of the task!
Today was a single period, so the students have not quite completed their burgers. When I see them next, they will finish them off then make short videos on the class iPads, explaining their burger so they are verbalising their analysis and descriptions as well as typing them.

Here is a video of the start of the lesson where I was going through my example.


Here is a short clip of the students getting underway with this exercise.

Monday, April 9, 2018

Year 11 Product Analysis

Last year, I tried doing a product analysis activity at the start of each lesson for a period of time with my Year 12 class. There is a blog post about it here.
This went well so I have added it into my inquiry plan for my Year 11 group for this year. I have written about my short term plan for the class here.

We started this today, and I put a simple product up on the screen for the whole class to discuss together. I split the question up into SOLO levels and colour coded what the students said appropriately to these levels.


The class were a bit shy about doing this for the first time today, but I hope they will get more confident about it as we go, as my plan is to do this all together as a whole class at the start of each lesson for quite some time. Link to Google Drawing here.


I then shared this Google Drawing into the class Google Plus Community so they can refer back to it and remind themselves what we did.

I hope that this makes the language of describing and explaining products and design work becomes what they use in a more natural manner. This then will feed into the analysis that they have to do about their own design work.

Tuesday, February 20, 2018

NCEA Level 1 Design Development Analysis


With my NCEA Level 1 Design and Visual Communication students we are learning to use Adobe Illustrator and Adobe Photoshop to develop our design work.
We are up to the stage with our design development where we need to write an analysis of what we have been doing.
There has been a lot of language and vocabulary that we have been using in both the design stages and the learning of the software that needs to be included in the analysis that they have to write.
I am going to share the following information / questions with them on a Google Document to support their analysis writing. We are going to do the top section together, so we can all add words into the key words box. These can be from the design elements work we did, the layout work or the programme specific vocab that we have been using.
The students will be sharing their design work into the class Google Plus Community, so I want them to write their notes in the comment sections under the posts. They have to do one of their own designs and one from someone else in the class. When I have asked students in previous years, they have always found it easier to analyse each others work rather than their own. By putting it on the community, they can all see each others' notes, so can get ideas from each other without feeling shy about it.

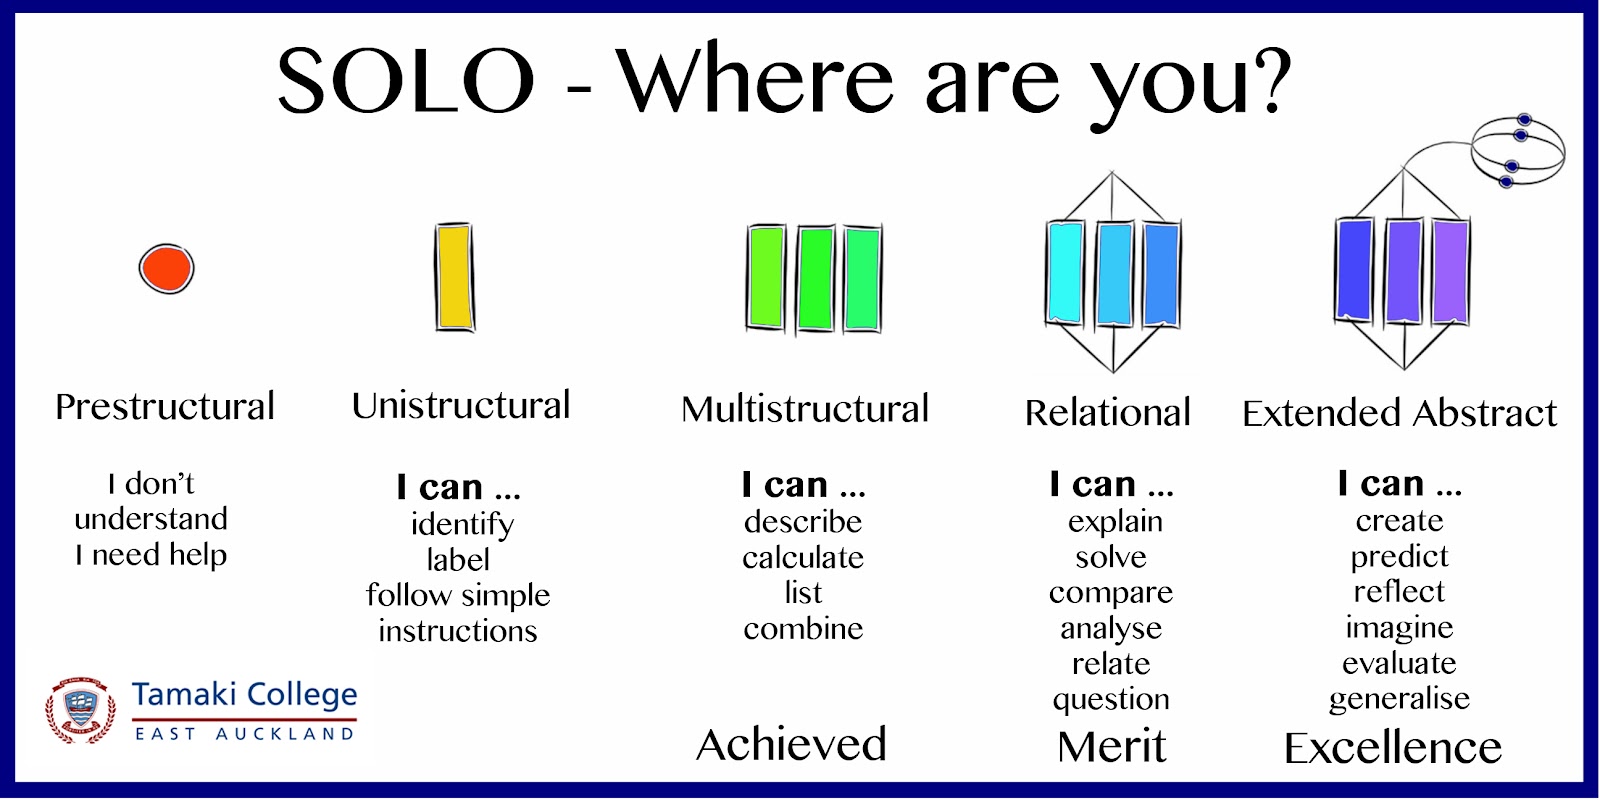
I have colour coded the work green to tie in with the SOLO Taxonomy posters in all the classrooms that show the multistructural sections in green.
Link to document


Design Development Analysis Step 1 - Describe


We will fill up this key words box together as a class before you answer the
questions about your design work and the design work of others in the class.


Key Words


Page
What shape and proportion is the page chosen to design the poster on?


Main Title
Where is the main title on the design?
How big is the main title when you compare it to the rest of the design?
What font style has been used?
What colour is it?


Pictures / Images
How many images have been used?
Describe how the images have been laid out on the page.


Information
How many columns of information are there?
What kind of font has been used?
What size font has been used?
Is it easy to read?
Describe where it has been put on the page and how it has been laid out.


Extra Analysis
Describe where the white space is on the design.
List the colours that have been used in the design.


Thursday, February 15, 2018

Analysis of Existing Products with Year 9

My year Year 9 class are designing fruit juice cartons this year. We will be producing the networks of their designs using the laser cutter with slide on sleeves on the design to create different layers and shapes.
Class site here
Before we get to design work we need to look at existing carton designs to see what is on them.
The first part of this today was a good exercise in resilience and failing. We were trying to do a Google Image search for a picture of a juice carton that is taken apart and folded out flat. We tried "juice cartons 2d", "juice cartons networks", "juice carton flat" .... and many other attempts in between. The students were great. "Try this one Miss"... "no that doesn't work" .... We eventually got some hits with a suggestion from a student "net of juice carton".
They then had to put his on a Google Drawing ready for analysing.
This example here is the one I was working with on the projector screen as the students did theirs.

What the students had to do was identify and label the main elements of the design. We were shouting out ideas for everyone to find that on their example. All the students images were different designs so they had to focus on finding these elements.

I highlighted the SOLO Taxonomy poster on the classroom wall and told them we were working at the unistructural level doing this as we were
I highlighted my example that was being put together on the board they worked in yellow for these sections to match with the poster.

We then talked about which elements had to be included on food packaging by law.
These were highlighted in green to indicate that we had started to describe the different parts of the design by doing this and were therefore in the multistructural area of SOLO Taxonomy.


We had a double period today, but only did this exercise for the first one so it is still unfinished. We did a bit of practical work in the second half and started looking at making 3D shapes and made a cube.

Tuesday, December 12, 2017

Manaiakalani Google Class OnAir Lesson 18 - Research Reading


See the whole Class OnAir team here


Direct Instruction

The students are brought together to be shown a Google Drawing that will be shared with them via the class site.
The purpose of this is to get them used to picking out key items of information from written text that they see on the internet.
This is to prepare them for next year when they are going to be collecting information about their architect and they need to pick out key points that they can use.


Link to Google Drawing exercise


Student Created Content

These are examples of student work that they created on the day.


This video shows sort clips of a few students talking about their work.


Lesson Topic :- Understanding Written Research - Introduction
Year Group :-  Year 11 (Jump Start )
Learning Outcome
To be able to read a piece of information from the internet and use SOLO structure to help them IDENTIFY elements, see where design work is DESCRIBED and see where decisions are EXPLAINED.

Success Criteria
Using SOLO


Uni
structural
Multi
structural
Relational
Extended abstract
Students can identify the elements in the text where the design and the materials used are identified.
Students can read through the information given and can highlight the areas that list and describe elements in the text.
Students can analyse the information given and can explain why they are highlighting the parts that they are.
They can start to question what they are reading as to what they don’t understand.
Students complete the reading and evaluate it so they can highlight all of the areas needed. They reflect on what they have read and pull out the words that they do not know and add them to the Answer Garden.

Links with the New Zealand Curriculum
NCEA Level 1 - Curriculum Level 6

Outcome development and evaluation

Critically analyse their own and others’ outcomes to inform the development of ideas for feasible outcomes.

  • Thinking - reading and analysing found text.
  • Using language, symbols, and texts - using SOLO to highlight key points in the text.
  • Managing self - working well as a team of two to complete the work.
  • Participating and contributing - listening to the explanation and giving input into the conversation. Giving input between them in the pair work.
  • Relating to others - Listening to the opinion of the other person in the team while doing the exercise.

Prior knowledge
The students know which architect they are focussing on.
They have produced some concept ideas for the layout of their posters.
They have not started the information collection about their architect or their work yet.
Lesson Sequence


Session Outline
The students will work in pairs on a reading exercise.
They will read through an excerpt taken directly from the internet and work together to pull out key items and colour code them so they are visible.
Student Activity
Teacher Activity
  • Listen to instructions as a whole class.
  • Get into pairs and make a copy of the activity.
  • Read the given text.
  • Discuss between them what words / sections they are going to highlight.
  • Explain to the whole class what the activity is about while they are all together at the front of the class.
  • Ensure they are working in pairs.
  • Give help and support where needed as the activity progresses.
  • Discuss individual words and phrases with students.
  • Encourage / remind students to share their work and to put unknown words into the answer garden link that is on the document.
  • Make a copy of the document and share in their pair.
  • Highlight the chosen words and sections with the appropriate colours to make those parts visible on their document.
  • Decide which words they do not know at all and add them to the shared Answer Garden.
  • Share work into the class community.
  • Look at the words that others have shared into the Answer Garden to see what others do not understand.
Resources

Chromebooks
Access to desktop / class room computers for students with no chromebook.
Next Steps
The students will look at the words in the Answer Garden in detail and work through finding out what they mean as a class / team.
Reflection and Analysis

What went well.
The students worked well in their pairs to do the exercise. They read through the given text well and making them highlight sections ensured that they read through it more than once looking for specific elements.
This was the first time trying this kind of activity, and they responded well and understood why we were doing it and how it would positively impact their project work in the long run.

What still needs work.
Should I choose the teams / pairs or let them work with who they are comfortable with?
Some teams are more on to it than others so the makeup of the teams has an impact.
I only got them to highlight a couple of key things in this initial exercise. Can I get the same impact if they are looking for a longer list of things from the same text?