Thursday, May 31, 2018

CoL Meeting Week 5 Term 2

We cluster together to try and change the results all together.
Pedagogy is not the same in different subjects - domains. Choose the approach which is best at the time for the students and the content you are working through.
We need to share what is working because of this so we can all help each other as teachers.
Great ideas are not great if they don’t go with good pedagogy. Linking evidence to practice.
Learning to read - reading to learn - these are two different things so need to be taught differently.
But, you learn to read as you are reading so some content is needed in the process.
Students need to want to improve not just get the job done.
They need to think about their learning and how to improve it.


When you plan the work, are you allowing enough for the students to add their effort and the teacher is not doing too much?
Value added is more important. How did they get from here to here?
Teaching as inquiry is formatively assessing the practice of the teacher.
Faster is not better if it is boring.

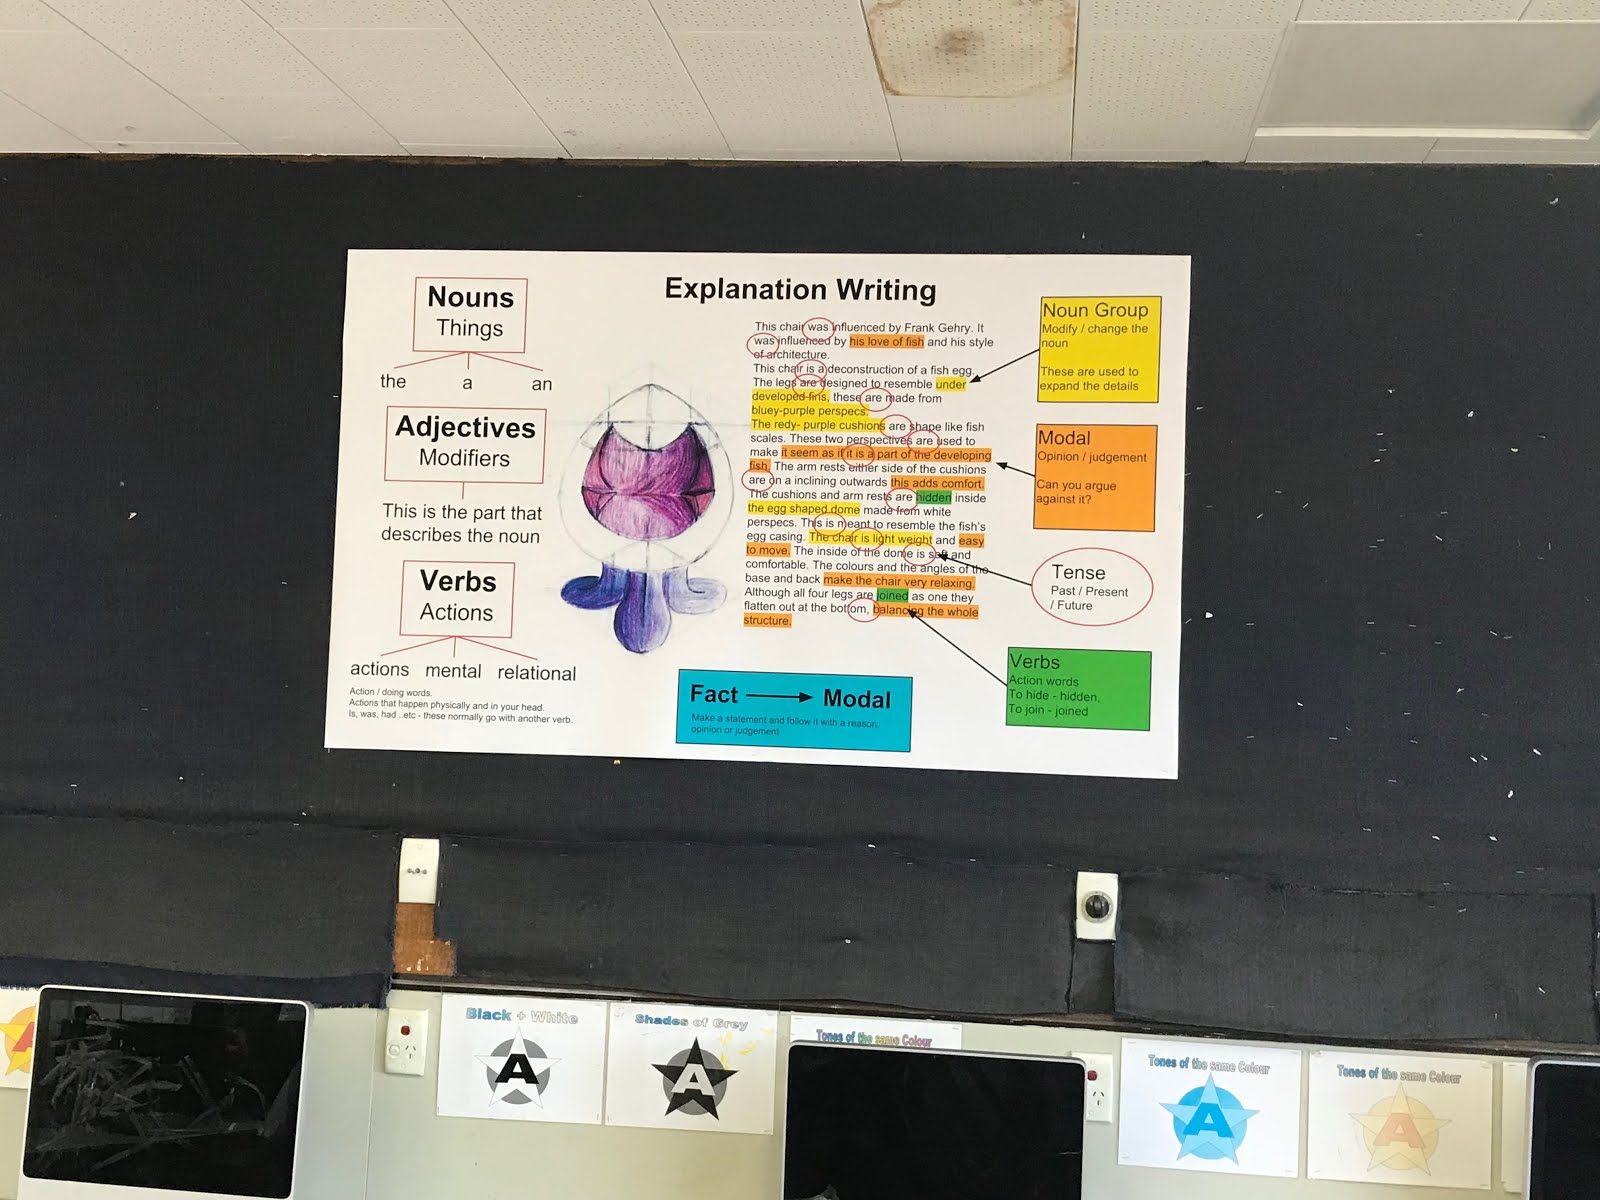
Language in Abundance - Dr Jannie van Hees

Link to presentation

Language carries knowledge and knowledge carries language.
There is no learning that does not require language.
Increasing levels of complexity are needed as well as the words / vocab / language
Is what you are doing helping the students to continuously raise the level they are able to cope with?
Constantly asking the students questions does not give them more information, you are wanting what they already have.
Give :-
Vocabulary lift
Structural lift
When talking back to the students when they are talking about their work.
They also have to elaborate to each other when they are sharing in pairs / groups / the class.
How do you get the balance between giving them more language through elaboration and too much teacher talk?
Can we respond to students but make sure the whole class know that the answer / learning is for all of them?

Talking together - a conversation
to and fro talking - chain linking
listening and responding.
Students have a sentence each and have to link onto the last one to create a paragraph of linked sentences.


Tuesday, May 29, 2018

Breaking Down Literacy Strategies

Over the last couple of department meetings, we have had visits by Mr Marc Milford, the school's literacy specialist. We have looked at writing examples and worked on identifying some of the language features in those examples all together as a department.


After these sessions, Marc said that it would be a good idea fo each of us to sit with him on a one to one basis with examples from our own learning areas as we all teach such different parts of Technology.

I sat with Marc today and we looked at an excellence exemplar from standard AS91067. I wanted to focus on this one as the Year 11 students are working on this at the moment and are at the point where they need to analyse their design developments in order to move onto their final design.

I printed off the exemplar and stuck it into the middle of a big piece of paper so we could scribble notes all round it and highlight key points in the text.


I then transferred this rather untidy mess of thoughts into a Google Drawing. This was so that I could share it with students and print it out for the wall.


I then printed this out really big for the back wall on my classroom that I have recently cleared. I intend to also add subject specific vocabulary on this wall to join this large poster and sentence starters, joinings and help.


Marc is going to visit the class this week to work through another exemplar with them so they know what features they are looking for and what to include in their own written work about their designs.

Sunday, May 27, 2018

Manaiakalani Class OnAir Lesson 6 - The game with no rules


Link to Manaiakalani Class OnAir to see the whole team.

Direct Instruction

The students are given very minimal instructions about how to play a game and no questions are answered. They are not told what we are doing or why we are doing it. They have to slowly evolve the rules of the game over time by either adding a rule or changing one that is there. Each run of the game is 2 minutes before a change is made.


These are the brief instructions given at the start of the activity. You may want to turn your sound down as the rain on the shelter we were under is really loud. I have put subtitles on the video.


This shows a couple of examples of when the rules were added to or changed during the progress of the game.


This shows how the game evolved over time with the rule changes and additions.


This video shows the teacher instruction at the start of the second lesson of this activity where we were reflecting on what happened during the game the previous day.


Class Site Content


This is the rules and game play that the students came up with during the process.


This is the equipment that we had ready to use - not all of it was used as it depended on the rules and game play that the students came up with.

Learner Generated Content


This padlet is the feedback that I received from the questions :-
  • How did you feel when I wouldn't tell you why we were doing the activity?
  • How did it make you feel when you did not know all the rules before you started?
  • What did you think when I would not answer any of your questions?
  • How did you feel when you did not agree with the rules that others were making?
  • How did you feel when you had a great idea for a rule but your name did not come out of the bag?
  • How do you feel when we do Design development? Is there anything that is the same as how you felt yesterday?

Made with Padlet


Student Feedback


Link to lesson plan document here
Lesson Topic :- Switch or Adapt Game / The Game with no Rules
Year Group :-  Year 11
Learning Outcome
To make the students think about their feelings while playing this game with no rules and compare that to how they feel when they do design developments.

Success Criteria
Using SOLO


Uni
structural
Multi
structural
Relational
Extended abstract
Students follow the instructions given by the rest of their team and the other teams.
Students can start to combine the game rules to play the game in a better way.
Students can analyse what is going on in the game and use this information to change or make rules that solve problems.
Students can reflect on what happened during the game and analyse their feelings. They can think about these feelings and predict how the design development process makes them feel in relation to this.

Links with the New Zealand Curriculum

NCEA Level 1 - Curriculum Level 6

Outcome development and evaluation

Critically analyse their own and others’ outcomes to inform the development of ideas for feasible outcomes. Undertake ongoing experimentation and functional modelling, taking account of stakeholder feedback and trialling in the physical and social environments. Use the information gained to select, justify, and develop a final outcome. Evaluate this outcome’s fitness for purpose against the brief and justify the evaluation, using feedback from stakeholders.


  • Thinking - coming up with rules for the game. Linking what they are doing to design development.
  • Using language, symbols, and texts - writing out their game rules for the rest of the class to see.
  • Managing self - focussing on the activity as it has no set structure.
  • Participating and contributing - following rules made by other people.
  • Relating to others - working as a team.
Prior knowledge
The students have started the design development process for their chair design project. They have also done a little design development in the previous poster project.
Lesson Sequence


Session Outline
The students slowly build a game over time using small steps. They then think about how they were feeling during this process and try and relate it to the design development process.
Student Activity
Teacher Activity
  • Listen to the teacher instructions.
  • Listen to each other’s ideas.
  • Listen and use the rules of the other teams.
  • Give the first part of the small instructions.
  • Give the rest of the instructions in small amounts as needed.
    • Split into 3 teams
    • The game must use a ball
    • Each team must write a game rule of one of the wipe clean boards.
    • Time the game rotations to two minutes each time.
    • Encourage teamwork.
  • Don’t answer any questions.


  • Use the rules that are being decided on by the teams to slowly build a game that has teams and a ball, plus any other equipment that they want to use.
    • Play the game as a team against the other teams.
    • Think about how they felt during the process of the game and not knowing what they were doing beforehand.
    • Make a shared padlet with their thoughts.
    • Share their thoughts / answers to the set questions about how they felt and how they can compare how they felt doing the game with how they feel doing design development.
    • Read everyone else’s responses.
    Resources
    Small wipe on / off boards.
    Dry wipe pens
    Game ball
    Team colours
    Hockey sticks
    Counters
    Hoops
    Cones
    Timing device (stop watch, mobile phone ...)
    Next Steps
    Next Lesson
    Continue with the design development that they are on with and reflect back on what they were feeling while playing the game.
    Further in this project
    Design development is a big part of any project, so I want them to think about how they are feeling during the process to see why they are getting upset and frustrated with it when they have to come up with more ideas and change the ideas they already have.
    Reflection and Analysis

    What went well.

    Lesson Content :- There was definitely enough for the students to do as it took nearly the whole double period. The double period gave them enough time to discuss things as a team and together and work things out without being rushed.

    Student Understanding :- The best question came at the end of the game session. “Miss, what was the point of playing a game with no rules?”. They made a good start on understanding why we did this in the second session where we were analysing their feelings and linking it to design development.

    Student Outcomes :- The answers on the padlet were great. I wanted them to be frustrated with the process and most of them were. It was a really interesting insight into how they approach things. It ranged from :-
    • Frustrated for the whole time
    • Being confused but going with it
    • Loving the challenge of not knowing


    What still needs work.

    Lesson Delivery :- I need to book / sort out the venue in a more organised way before the lesson and check the weather!

    Student Understanding :- Should  have thought about groupings myself and not let the students do it? I noticed that students who thought in similar ways put themselves together. Could a more inclusive outcome have happened if I had placed stronger and weaker students together in teams ? How would I work this out?

    Other Comments.

    What came out of this activity was a really interesting insight in how the students think away from the subject. I need to think about how I can use this information in more ways in the lesson as well as design development,

    Tuesday, May 22, 2018

    Reflection on School Goal 2


    Goal 2 Literacy and Numeracy

    That 80% of Year 9 & 10 students are reading at or above the expected Curriculum Level.
    That 70% of Year 9 & 10 students are writing at or above the expected Curriculum Level.
    That 70% of Year 9 & 10 students are achieving in Mathematics at or above the expected Curriculum Level.

    That 90% of Year 11 students will achieve NCEA Literacy.
    That 80% of Year 11 students will achieve NCEA Numeracy.


    So far this year, I have been using a lot of SOLO Taxonomy structured work for both junior and senior classes. I feel that this supports the students with slowly increasing the level of complexity of their writing and analysis.

    Examples : - 

    I have also been focussing on literacy strategies as part of my inquiry for the CoL.


    This has also been my focus for my Manaiakalani Class OnAir work this year.

    Monday, May 21, 2018

    Description Burgers

    I have been doing product analysis exercises with my Year 11 students all together on the board. What I want to move on to is using sentences rather than stand alone words and comments. We have been reading the exemplars from the NZQA website about the standard we are working on so the students have more of an idea about what the expectations are.
    I have been putting together lots of useable worksheets and activities about using SOLO Taxonomy for a while now so I thought I would adapt one of those to use.

    I have a blank description burger on a Google Drawing that I thought we could adapt and use for product descriptions. I adapted this burger drawing from one that is in The Writing Book.
    I used this to make an example to show the students and take them through the process.


    After talking to Cheryl (the school's specialist classroom teacher) about my plan and showing her my initial scribbles on paper,  she gave me some great links and ideas that I could include.
    One of these was this document, the Q-matrix, with focus questions.


    I used this to help me put together this support document for the students, where they could take questions from here to help them when doing their own burgers.


    I put all of this support material into the class Google Plus Community so it was easily accessible. I also supplied 3 simple images that they could choose from for their descriptions if they had trouble deciding on one for themselves. As usual, too much time was spent on this decision than the important parts of the task!
    Today was a single period, so the students have not quite completed their burgers. When I see them next, they will finish them off then make short videos on the class iPads, explaining their burger so they are verbalising their analysis and descriptions as well as typing them.

    Here is a video of the start of the lesson where I was going through my example.


    Here is a short clip of the students getting underway with this exercise.

    Saturday, May 19, 2018

    Manaiakalani Class OnAir Lesson 5 - Reading NZQA Exemplars


    Link to Manaiakalani Class OnAir to see the whole team.

    Direct Instruction 

    The direct instruction was split into sections on two different lessons. We looked at the NZQA exemplars for the standard we are working on at the moment.


    In this session, we read the exemplars for AS91067 all together and compared what the writing for Not Achieved through to Excellence looks like.


    In this session, the instructions are about highlighting the texts to show where sections are.
    Describing words, reasons why and decisions and links to the architect's work.
    Here, the students are brought back together again to talk about looking for where information is shown together in the text rather than in individual pieces.
    This video shows some of the ongoing lesson with the students talking about what they were finding in the texts they were reading through.

    Lesson Topic :- Reading the NZQA Exemplars
    Year Group :-  Year 11
    Learning Outcome
    To be able to read through one of the exemplars from the NZQA website and pull out ad understand some of the key information.

    Success Criteria
    Using SOLO


    Uni
    structural
    Multi
    structural
    Relational
    Extended abstract
    Students can IDENTIFY the describing words in the exemplars.
    Students can DESCRIBE how the achievement levels are different to each other.
    Students can EXPLAIN how the achievement levels increase in complexity.
    They can ANALYSE the design reasons given in the examples.
    Students REFLECT on how the written examples show the links to the work of the architect and EVALUATE how this influence is shown in the drawings.

    Links with the New Zealand Curriculum

    NCEA Level 1 - Curriculum Level 6

    Outcome development and evaluation

    Critically analyse their own and others’ outcomes to inform the development of ideas for feasible outcomes. Undertake ongoing experimentation and functional modelling, taking account of stakeholder feedback and trialling in the physical and social environments. Use the information gained to select, justify, and develop a final outcome. Evaluate this outcome’s fitness for purpose against the brief and justify the evaluation, using feedback from stakeholders.


    • Thinking - looking for differences in the achievement levels of the examples. Understanding and looking for examples of description words, reasons and architect links.
    • Using language, symbols, and texts - reading examples from NZQA
    • Managing self - listening when the teacher is reading to the whole class and working in a small team in a constructive way.
    • Participating and contributing - giving feedback as a whole class and in small groups.
    • Relating to others - listening to the opinions of others in the class and their groups.
    Prior knowledge
    The students have made a start designing their own seating designs based on the work of the architect of their choice.
    They have a lot of information about their chosen architect from the previous standard.
    Lesson Sequence


    Session Outline
    Students will be first reading through exemplars from the NZQA website and then picking out key elements from them.
    Student Activity
    Teacher Activity
    • Sit round the front table all together with own paper copy of exemplars. Read through them while listening to the teacher read them outloud.
    • Read the exemplars through with the whole class.
    • Encourage feedback from the students about the differences they see in the writing of the different levels of achievement.
    • Roam as they work in their small groups.
    • Encourage and question to stimulate conversation about what they are highlighting.


  • Use highlighter pens to focus on describing words used in the exemplars.
  • Look for reasons why decisions were made in the design work.
  • Look for and highlight any links to influence to the architect’s work.
    • Share ideas as a whole class about the differences they see in the levels of achievement in the exemplars.
    • Work together in small teams and discuss what to highlight on the examples.
    Resources
    Targeted exemplars in a folder in Google Drive - print these out, one for each student.
    Highlighter pens
    Next Steps
    Next Lesson
    We will be continuing with our own design work over the next couple of lessons.
    Further in this project
    We will be using what we have learned from the exemplars to write notes with our own work. We will then read each other’s work in the same way that we have read the online exemplars.
    Reflection and Analysis

    What went well.

    Lesson Content :- Having the exemplars prepared and printed worked well and really got the students to focus on them

    Lesson Pacing :- I think splitting the tasks between two lessons was a good idea as it meant not spending too much of one single lesson doing this and the students were more focussed in the shorter sessions.

    Lesson Delivery :- I have not read to my class before so this was a totally new thing for me. I enjoyed it more than I thought. This was helped by the nice reaction of the class.


    What still needs work.

    Student Understanding :- The were not always clear about when they were reading reasons why design decisions were made. This is definitely something I need to spend more time with them on.

    Student Outcomes :- There was not as much talking between the students as I wanted to happen during the highlighting exercise. Hopefully when we do more of this and with our own work, there will be more talk.


    Other Comments.

    Having the exemplars printed out from the whole project made it easier to focus in on particular designs. Typing them out for the students also helped as they did not have to try and read the handwriting on the examples. This made it much easier for them to compare the achievement levels.