Monday, June 12, 2017

Planning for Learn, Create, Share ...

I have been writing my latest lesson plan for Manaiakalani Class OnAir.
After sharing it, I was asked an interesting question. Could I make it explicit where the Learn, Create and Share elements were in the planning?
I have decided to take all the colour elements off the lesson plan struture that I had already put in place for Class OnAir and only use colour to highlight two things - SOLO taxonomy and Learn, Create, Share.
I have included the logos / visual elements of both of these things so the colours can be related to the visuals.
I could have used titles and labels but decided on a typically Graphics teacher way of approaching it and used colouring in!!

Here is the link to the whole lesson plan. It is spread over the series of a few days.

Here are the elements that I focussed on highlighting :-

SOLO Taxonomy success criteria


Learn, Create, Share


I like the way the colour brings out the key elements to focus on.
It makes it very clear where you have hit learn, create, share in the lesson planning and how much weight each one has in relation to the others.

My next steps could be assessing where these elements are highlighted in the teacher activity as well as the students.

Sunday, June 11, 2017

Notes from Dr Graeme Aitken Presentation

The good thing about our cluster of schools working all together and working online, is that even when you are not present at a great presentation, you still get to join in when it is shared!!
Dr Graeme Aitken came to talk to the school leaders (in the case of the college, this was the middle management) and the presentation was recorded.

These are my notes from the video recording ...

My main take out from this was to share and learn from each other ..

"We can do it wrong, we just can’t keep doing it wrong.
We can’t keep doing it wrong when the person next door is doing it right."

Here is the Google Slide presentation that went with the talk...

Notes from Dr Graeme Aitken video

Collaborative inquiry is not about travelling through the process and not being changed on the other side.
Integration around key challenges leads to collaborative inquiry
Inquiry is not about a way of teaching but an approach to teaching

Fundamental key stages from the curriculum document :-
What difference do you want to make - focussing
How are you going to teach in order to achieve that?
What evidence have you got that you made any difference at all?

Look at what needs to be changed in you not the class / students in order to achieve what you want to happen.
How can you manage inquiry so a few teachers work together around a common idea? Then there will be more cane of solving the stickier problem that you come across.

Teaching has 3 goals -
Enjoyment and interest in what the students are doing,
Build confidence in the students that they can do it.
Raise achievement.

Collaborative inquiry needs to cover all three  elements and not just the last one to the detriment of the other 2.

Scan - get your hunch - what is the problem
Why you think that this is a problem will have a huge influence on the plan and resourcing that you come up with to try and solve it - your proposed interventions will alter enormously depending on where you see the source of the problem.
This is where collaborative inquiry between teachers has a big impression to make as you can work together to nail down which of the many things that you have thought of could be the cause of the problem.
A lot more ideas come from the discussion of a group of teachers about the problem.
Honesty and trust is required by the teachers involved in this.
“We think it’s probably this one”...we only have a best guess at the time.
We can afford to make mistakes but we can’t afford to keep making the same mistakes.
We can try things out and test things and analyse the outcome.
What do we as teachers have to learn / do in order to do this best guess?
Try different hunches, but you don’t all have to try the same solutions even if working on the same issue.
As teachers, why are we so bad at learning from the good stuff that others are doing?
Modesty stops us and saying that others have better students than you. If medicine worked like this we would all be dead. Doctors share treatments and what works. Teachers are bad at doing this.
We have to build a culture of trust and learning from each other, not shooting down or hiding.
Sharing stories of success and failure are both equally important.
Being honest and open about what absolutely did not work is of so much help and interest to other teachers.  This is real collaborative inquiry way to go but it needs trust that you will not be judged and it will not be used in appraisal.

We can do it wrong, we just can’t keep doing it wrong.
We can’t keep doing it wrong when the person next door is doing it right.

Are you making enough of a difference?
How are you measuring the difference you are making?

Wednesday, June 7, 2017

Talking Self Assessment .....

Recently, I have been becoming more and more interested in self assessment in regards to the SOLO Taxonomy work that I have been doing. Link here
After the last CoL meeting where we had to look at what we had done and where we were going, I decided that I wanted to go and see teachers in other schools who were using self assessment in successful ways.
My first stop for this was this morning when I went to see +Robyn Anderson who works at Panmure Bridge School.

My key take outs that I can use with my classes from today were :-

  • Critical friend - as well as working and analysing all together in the class communities, I will look at having them working in pairs to analyse each others work based on pre prepared levels.
  • Build the success criteria in from the start at the project planning stage.
  • One step at a time, oral feedback and assessment is ok depending on the students.
  • Building the academic language into the assessment slowly with explanations as you go.
  • Structuring the open / paragraph questions for student feedback into smaller parts with openers, key words and starters, or give them a list of points to work through on their feedback.
  • Work through the self assessment (in whatever format) with the students, maybe with an example to work with.
  • Self assessment can happen at any point in the process of the task and be supported in a number of different ways. It can also say how they have done for the whole task or guide them in how they are doing throughout the task.
  • Put much more support stuff on the wall for the duration of any particular task.
It is great that I went thinking that I was going to be talking about a very tight, specific, at the end of a task "self assessment" topic, but I came out with a huge amount of ideas of where I can add support and self assessment / awareness into the whole process.
Thanks Robyn and your fantastic Year 8 students who came to talk to me too. I learned such a lot today.


______________________________________________________________________________

I had shared the questions with Robyn the day before I went so they were not not a surprise on the day. The notes below are a combination of what Robyn had prepared and what we talked about on the day.

Questions for the teacher ….

What format do you use for student self assessment?
Docs, forms, ……..

  • Forms or docs for end of term evaluations - we ask what the students liked/didn’t like - they evaluate how they think they are going as well as work wise.
  • Rubrics are level dependent. Some lower level support is done orally and not on a rubric, and it is done on a student by student basis.
  • Modelling books - these are done in pairs and teams. This can then be referred to again by the students to see how they had done something and also for them to see how much progress they have made. The groups are based on the strategies that the students are using, so they can give each other support. They can also look at these and verbally state what they need to do to improve.
  • Critical friend conversations
  • Written as: ‘You will have done this correctly if you have…’ - these are written on the board for individual tasks and are also on the wall for topic structure.
  • Thought about in long term plan but co-constructed usually on whiteboard with students then discussed/unpacked. This gives them a focus for peer feedback and a key to know what it is they need to do. All the assessment / support structure is embedded at the planning stage in each task that the students will be doing. All the success criteria are there from the start then the students are guided into structuring it for themselves.
  • Embedded in lessons - depending on group a lot is done orally
  • Hyerle’s thinking maps eg: donut circle what I know now...what learnt etc
  • Strategies used for a task are highlighted at the end of a session by asking the students questions about what they have done and how they did it.

Do you “student speak” it?

  • Yes - often use their words after all it’s their learning we are assessing
  • Needs to become routine 
  • Student speak is set up to access the academic language needed for individual tasks. This is built in so they students can access the topic / subject specific language as they go.

How do you lay it out in terms of ….
Colour, columns, images, font style and size…..

  • Forms uses paragraph answers if evaluating
  • Columns for rubric - eg: speeches
  • Otherwise we use bullet points that can be ticked or highlighted with examples eg: DRAFT
  • Structure the open questions into sections. Focus the sections. 
  • Give them lists of points to work through.

Do you use the same self assessment for more than one class / group or do you tailor them to specific groups?

  • Term evaluation/PMI same for whole class
  • Subject specific is up to individual teacher and tailored to suit the particular group.


How much preparation do the students need in order to use a self assessment sheet?
  • You have to unpack it to get buy in and/or accurate use
  • Familiarisation is the key eg: ‘You will have done this correctly if you have…’
  • They need lots of preparation and need the material to be gone through thoroughly in order to understand what it is they have to do.

Do you make self assessment sheets targeted for specific task / projects or do you aim them for broader things like key competencies for example?

  • Subject/task specific is what we usually link to
  • KC’s identified separately (eg: group participation/camp) - CARE awards cover and reinforce KC’s
  • Pictures in PE of self v professional athlete - draw comparison lines in (idea from Jason Borland MIT 15)

Useful Links


Do you get feedback from the students about how they find using the self assessment that you set them to do.
  • Sometimes. This is a different challenge every year depending on the level of my groups. Most is done orally in pairs or groups to put a positive spin on the learning. This breaks down the ‘hard’ and shows them how much they do know
  • Focus is put on where they are and what they have achieved, rather than where they should be as this can be a little demotivating at times.

Does your whole school do this or is it optional for individual teachers?

  • All classes use own format - age/ability dependent eg: Juniors use pictures whereas we use words 
  • My rubric was simplified for juniors so language is consistent across the school
  • Some teachers use hand signals
  • Some like me use PLI - where students identify their own next steps
  • Using a consistent format means the kids really understand and strengthen connections to where they were.

Do you show the students the self assessment before they do the task so they know what they are looking for afterwards?
  • Yes - we do this together before the lesson.
  • Formats are consistent so the students understand them quicker and easier as they are already familiar with them.


Questions for the students …

I got to speak to a fantastic group of Year 8 students today


Do you like being able to see for yourself where you are in your work without the teacher always having to tell you?
  • Yes - this first answer was due to the terrible way to phrase the question from me. After Robyn came in and got them to explain why, we got more depth.
  • You get to see what you "did good" and you you need to work on
  • Set a goal for yourself
  • What you need to improve on
  • Prefers the teacher saying as it is easier to understand and make connections.

How easy is it for you to do self assessment? - I also asked the what type they liked.
  • Yes
  • Grids
  • Critical friend - helps to improve - gives honest opinion on what to work on
  • Feed back and feed forward

Do you understand what you are doing when using a self assessment sheet and do you know what it means for you? 
  • No, not if Ms did not go through it first
  • Ms always goes through it so we understand

Does it make doing the task easier if you know you are going to assess it yourself at the end?
  • Yes
  • Learning intentions are clear at the start
  • Side prompts and scaffolding in the task help as you go along
  • Unpacked in pairs or with teacher so we understand it


Here are some photographs from the displays of support material that is on the walls.

Thursday, June 1, 2017

CoL Meeting Term 2 - Focusing Inquiry and Teaching Inquiry

We had our CoL meeting after school today. This is the second one this term and our focus in small groups, was on the following things :-

Learn (Focusing Inquiry)
Share a brief reflection in response to your Focusing Inquiry
  • What information, strategies, tools did you use to determine what your students have already learned and what they need to learn next? (3min)
As you share reference your blog and highlight how you have organised your evidence so that it is visible and accessible to your colleagues.

Create (Teaching Inquiry)

  • Based on this evidence what are you planning to do differently as a teacher? What might you need help with? (3min)


For the first part, my answer included my work with the seniors on their isometric skills for Manaiakalani Class OnAir.
After we had done this work, I sent the students a Google Form to get their feedback about how it went. In depth feedback about this here.
So my strategies were to get the students to analyse what they had done and what they thought they had got out of it as an activity. The tools I used was a Google Form and talking face to face with the students.
I talked about how not all the feedback I got from the students was good or positive but we got a positive outcome from it. "Bad feedback is good feedback".

For the second part of the feedback, I talked about my creation of the self assessment parts of the SOLO Taxonomy structured activities that I have been making recently. I have made these but not used them with the students yet. Blog post here and SOLO resources here. I feel that this is a good way to go as the focus is not on a particular activity or project or NCEA standard with these self assessment grids, but on the depth of thinking that the students have done.
The part that I am going to aim for help with is to ask to go and visit the classrooms of a couple of intermediate school teachers. These guys have been using self assessment as part of their teaching so I want to go and see how they do it and discuss with them about the difference it makes.

It was a really good session listening to everyone else in the group talk about their inquiries and what they have been doing. You get wrapped up in your own classroom and it is extremely interesting listening to other teachers talk about what they do and how they do it.


Updates to Year 11 priority students

There is an upload of credits going to NZQA in the next day, so we have been trying to get work finished, marked and uploaded to Kamar for the upload to be as up to date as possible.

With our PLG groups, we have been discussing which students we are considering a priority in our classes based on the data and the credits they have already.
A link to this is here
To be honest, the whole of my Year 11 group are priority to me at the moment as none of them have got the work completed that they should have by this point in the year. Blog post here
I chose 2 particular students to focus on for this study with the PLG group, as this would benefit my whole group anyway.

My plan has been :-

  • A shared spreadsheet so they can plot their progress and see the progress of others.
  • Taking the focus off the portfolio site, as we can get the completed work on there later. As long as I can see the work to mark, then it is OK.
  • A SOLO structured evaluation so they ended on a high point with plenty of depth.
  • Starting work on the next project and alternating working on that and getting the late work finished. This way, they don't feel like they are just slipping further behind.
Updates this week, which was the deadline for the new upload to NZQA.
One of my students has not been present recently due to an "incident" .. all good, we can continue next week when I get to see him again. 
(This student has been working well in another lesson so I got his teacher to have a chat with him to see if there was any problem that he wasn't telling me about.)

The other student I chose to be a priority was because she had credits in all of her other lessons but not in mine.
As of yesterday, she has completed everything to a really high standard. She talked with me about wanting to get an excellence so I shared with here some work form a couple of years ago for that standard. It has been externally moderated at an excellence so I was confident in sharing it with her so she could see what she needed to aim for.
She achieved her excellence and we are both VERY HAPPY!!

The rest of the class is nearly there, so I am expecting a good few more credits in the next week.
It is still not perfect,  as only one of the group has any credits yet, but it is moving in the right direction and we are being positive about it.


Tuesday, May 30, 2017

Using SOLO to structure Final Evaluation Questions

My NCEA Design and Visual Communication are up to evaluating their final poster designs. I looked at the support I had included on the class site for this and decided it was not good enough. The students are nearly there with their project and I didn't want them to fall at the final hurdle for want of an evaluation that was lacking depth.
I decided to structure the questions in the evaluation around SOLO so that when they write it, they have a gradually increasing level of depth.
Link to document here

Architect Poster Evaluation


Describe
How many images have you used.
How you have laid everything out on your design.
The type of fonts you are using for the title and the main information.
List
The design elements that you have used in this layout design.

Explain
The effect that you have created with the way you have laid out your design.
Why you think this effect has been created.
Why you chose the images you are using.
Why you chose the fonts you are using and what effect they give to the overall design.
Analyse
How the design elements work together to create the effect you wanted to achieve.
How you have reflected your architect’s style in how you have designed your poster.
Reflect
On what you have achieved with this design by giving your opinion on what the most successful and least successful parts are and give reasons for your opinions.
Imagine
What you could do to improve it if you were to start again.
Evaluate
How you think people people will react to this poster design - you can ask people for some feedback if you wish to include their opinions.


Possible keywords

Colour, Proportion, Focus of attention, Symmetry, Whitespace, Layout, Shape, Font, Balance, Scale, Size, Flow, Hierarchy, Proportion,
Visual Impact, Contrast, Position, Alignment

Adobe Photoshop, Adobe Illustrator, Architect, Style, Elements


Sentence starters


I have used ____ number of images on my design.
I have laid out my design by __________ and by using _________
The design elements that I have used in my layout are __________
The type of fonts that i chose are ______ They look like ________


The effect that has been created on my design is ________
I think this because ____________
I chose the images that I have used because __________
I chose the fonts that I used on my design because________
They give this effect ____________
Design element _____ and ______ work together well because_____
They create the effect of _____________
I have reflected the style of my architect’s work by _________


I think that the most successful parts of my design are ______
I think this because _______
I think that the least successful parts of my design are ______
I think this because __________
If I were to start my design again, these are the things that I would improve ________
I think that they would be an improvement because ___________
This is what people think of my design when they saw it __________


Monday, May 29, 2017

Student feedback on making their own rewindable resources.

During one of my Manaiakalani ClassOnAir episodes, I had my class of Year 12 and Year 13 students create their own rewindable resources about sketching in isometric using the isometric grid sheets. Blog post here
We put these resources on a blog that was made especially for the purpose of students teaching skills and activities to others.

I wanted to know from the students what they thought of doing this kind of activity and if it was worth doing more of in the future.
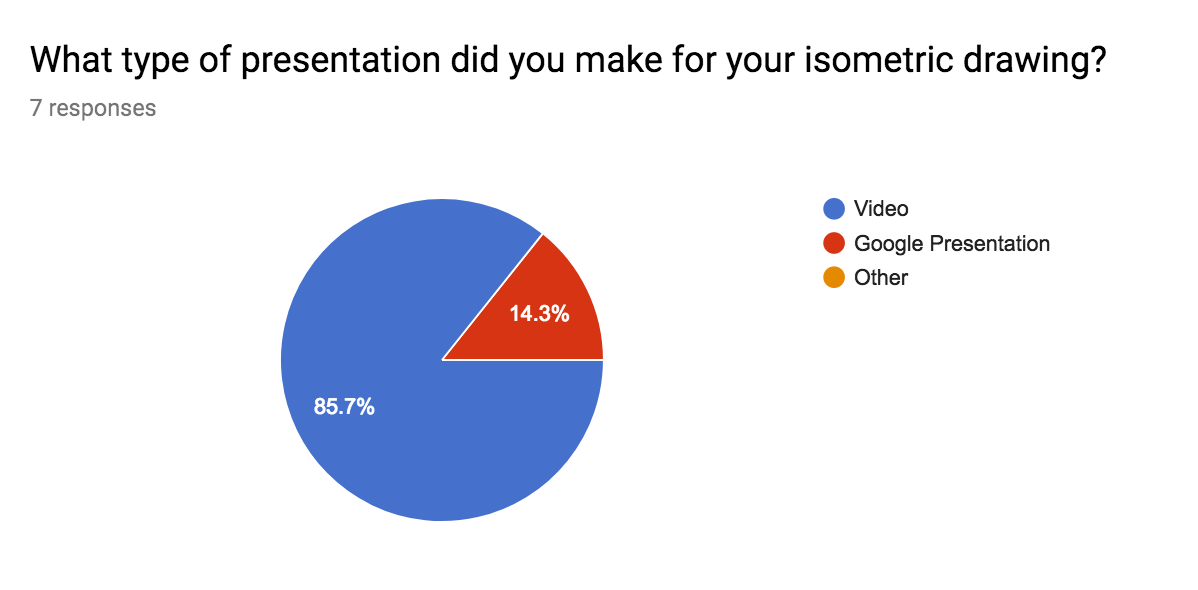

Question 1
It is interesting to see that most of the students chose the video rather than the Google Presentation. The video is more of an immediate response where as the presentation means taking the pictures then producing the resource with them.


Question 2
It wasn't too hard to make the resource as they all know how to make videos using the iPads or make a presentation in Google.
The student who rated this at 2 made a video, and after talking to him, he did not find it easy to talk to the camera as he was drawing. He felt that his english was not clear enough.


Question 3
It is good to see that my examples and the fact that I was there added to the ease of this activity.
It is interesting to note that talking to the camera was the reason why one student found this easy while it was the main reason that another student did not find this easy at all even though his confidence in the actual drawing activity is high.


Question 4
I had a chat with the boys after they filled this form in for me to dig a bit deeper into what they were thinking. My feedback on this comes later in the post.


Question 5


Question 6
Not many of them did the analysis for me at the time, so I think some of the answers here are a bit of a "fib".... !!!! .. or maybe just a response to not having done it.


Question 7
After chatting with the boys, the Year 13 students who have done DVC (graphics) with me for the past 2 years are the ones who got the least out of this activity in terms of their personal learning. I think this is fair enough as they are already confident in their use of isometric sketching as I have made them do it for 2 years!!


Question 8
A mixed answer which is good. Some will use these, and these students are the ones who are new to DVC and have not had much experience in drawing in 3D. The others have much more experience so it is understandable that they will not use these for them selves at the moment.


Question 9


After the boys had filled in this Google Form for me (and during for some of them), we had a really interesting chat about the feedback that they give to their teachers. One of them admitted that he tried to say what he thought the teacher wanted to hear. Another was unsure of what to put as he did not find the exercise useful, so I had to reassure him that it was honesty that I was after.
I tried to stress with them that when teachers (laying emphasis on me at this point as it was me asking them for feedback at the time) ask them for feedback, it is to improve how the course was going. If something is not to their liking they need to say so on the feedback or they cant help things change and get better.
I used the example of last year, when 2 Year 12 boys gave me feedback that they didn't like the fact that I made the whole group research Art Deco instead of giving them a choice. The upshot of that was them helping me to design the Level 2 course for this year.

This then led to a conversation particularly with the student who had given me the most negative feedback.
He is a really good artist. He does Art at Level 3 too as well as DVC and doesn't feel the need to do drawing exercises like this to remind him of what to do. He did not like talking on camera while making his video as he does not feel confident about his language ability. 
I asked him if he would feel better about it if he was making skills videos for the younger students, like the Year 9 and 10 classes. Again, he was not keen, with his reasons still being the talking on camera. When I gave him the suggestion of a silent video (or with music in the background) with written subtitles explaining what was happening, he was very keen. As I continue to use the blog we made for the students to use to remind themselves of skills, I will be asking him to make resources for the junior students to use. 

It is great that a bit of potentially "negative" feedback has brought about a great conversation and a possible direction to go in in the future.


Thursday, May 25, 2017

Using SOLO for Self Assessment

After starting to read "SOLO Taxonomy: a Guide for Schools Book 2", I have started to reassess the self assessment sheets that I had started to put together. Initially, I was including what level they were on, the description and a space for the students to include the evidence. After thinking about it, I realised that I didn't need to include the evidence column as all the evidence is on the sheet they are working on. In "SOLO Taxonomy: a Guide for Schools Book 2", it talks about making the target vocabulary explicit so the students know what kind of words they are needing to use at a particular level. This has resulted in me adjusting the way I have structuring these self assessment sheets.
I have produced two sets up to now. A describe chart and a compare and contrast chart, both with matching self assessment sheet to refer to.

They are both activities that are at a particular SOLO level, the describe is at multistructural and the compare is at relational, but the structure gives the opportunity for the student outcome to be assessed at all levels depending on how much depth they have included.

I have continued what I started in terms of using a coloured visual diagram on the self assessment chart to visually indicate what part of the whole thing the student has completed.

Next step is using this with the students to see how it goes. I have new Year 9 and Year 10 groups, so they look like likely candidates for experimenting and see how these go.

Describe chart